Showing posts with label Windows. Show all posts

MiniTool Partition Wizard Review

MiniTool Partition Wizard Review
MiniTool Partition Wizard is a powerful free partition management and disk cloning software for Windows users of any computer skill levels to easily create, delete, extend, resize, copy, wipe, and format partitions. Besides, you can use the program as powerful data recovery and disk diagnosis software.

Important Features of MiniTool Partition Wizard Free

  • You could copy your Windows operating system from one disk drive to another HDD/ SSD.
  • It will create primary and logical disks much easier than the disk management utility that is built-in Windows 10/8.1/7 PC.
  • MiniTool Partition Wizard only takes a few seconds to convert an NTFS formatted partition to the FAT file system.
  • You can change the drive letter of any partition on your computer with some simple clicks.
  • MiniTool Partition Wizard makes it simple to extend or shrink the storage space of a partition, without worrying about losing data.
  • If you want to check if there are any bad sectors on your HDD or SSD, you can use the software to do a surface test and repair them later.
  • This free software will help you check the file system of a disk partition to see if it is damaged. In addition, you can repair the file system if necessary.
  • It can quickly convert the MBR disk to a GPT disk. This feature is very useful when you have large capacity hard drives larger than 2 terabytes.
  • You can select all partitions and then delete them all at once.
  • Hide a partition or multiple partitions in order to keep your sensitive files out of the prying eyes of other people.
  • Split a big disk partition into two smaller ones to store different types of documents and make the partition size more reasonable.
  • Copy the Windows system partition, or copy the entire hard drive disk to avoid re-installing the system again.
  • Quickly convert the primary partitions to logical partitions, and convert the logical partitions to primary partitions with no data loss.
  • This free software will also help you to recover documents, photos, videos, songs, etc from lost partitions.
  • √ Wipe all the data stored on your hard drive to perfectly protect your privacy.
  • There's a built-in disk space analyzer that scans your disk and shows you what files are taking up much space, and what space is being wasted.

Free Download: https://www.partitionwizard.com/free-partition-manager.html

1. Disk Partition Management

MiniTool Partition Wizard Review
In the section of “Partition Management”, and you can create, merge, move, resize, split, delete, format, hide and wipe partitions for to make the fullest use of the disk space.

2. Convert Partitions

MiniTool Partition Wizard Review
Many users want to convert the file system of the partitions from FAT to NTFS, especially when they want to store large files with their flash drive, external hard disk. The high security of MiniTool Partition Wizard ensures that users can safely convert FAT to NTFS without causing any data loss.

3. Check The Disk Partition

MiniTool Partition Wizard Review
The Check File System function allows you to check the file system error or repair the damaged file system on your Windows computer.

4. Disk Benchmark

MiniTool Partition Wizard Review
You can use this feature to accurately measure the reading and writing speed and evaluate the performance of the hard drive and SSD.

5. Space Analyzer

MiniTool Partition Wizard Review
Using the Space Analyzer feature of the MiniTool Partition Wizard, you can quickly know the space usage on the hard drive. It will help you to find out the big files and duplicate documents that need to be cleaned up.

6. Data/Partition Recovery

MiniTool Partition Wizard Review
MiniTool Partition Wizard has designed the Data Recovery feature to enable users to recover files/data from the RAW partition, formatted partition, and damaged partition. Furthermore, it also empowers you to recover the files you have mistakenly deleted from external hard drives or internal hard drives.

7. Convert Disk

MiniTool Partition Wizard Review
It converts the MBR disk to GPT disk and also converts the non-system disk from GPT to the MBR, without the risk of losing your important data.

8. Migrate The Operating System

MiniTool Partition Wizard Review
To improve the computer performance and get the fastest possible responding speed, it is a good idea to replace the old hard drive with a larger, new hard drive or SSD. MiniTool Partition Wizard will help you to upgrade HDD to SSD without the need to re-install the Windows system.

MiniTool Partition Wizard is rather easy to use, even novice users can do the operations without hassle. In addition, as soon as you click the "Apply" button, you could see how the partition changes you make will play out, all without having to wait for each step to complete or reboot your system. This feature-packed software offers tons of partitioning options that will cater to the needs of nearly anyone.

How To Keep Your Drivers Up To Date On Windows PC

Keep Your Drivers Up To Date On Windows PC
In the era of modernization and technological advancements, we sometimes neglect essential aspects of our PC’s performance, i.e., drivers. This fundamental hidden software allows our PC to communicate with all the peripheral devices along with its components. In essence, key features that aid in keeping our devices healthy and improve overall performance as well.

The core meaning of drivers signifies the software that enables communication and interaction between the operating system and the attached devices or peripherals. The main malfunctioning of the drivers occurs due to system failures or correct supporting drivers not installed.

With the leading innovation and new devices being developed day by day it is necessary to maintain the supporting drivers that you have to install over the device and establish a connection between them. The driver updates do come from the manufacturer of the PC. Mainly, windows do support all drivers that could install on the devices for all upcoming drivers that Microsoft has tested and verified.

We all might have noticed the Windows updating blue screen coming up and sometimes it’s annoying cause it stays there for hours updating the device. The windows update that we get over the screen is an update for the drivers and device overall performance as we know that security flaws are discovered regularly and need to be implemented on the devices to protect and resolve any issues.

Updating Drivers on Windows 10:

Updating drivers over the windows devices needs special care and attention also there are various steps and methods by which we can check for the latest updates. We can manually update our device drivers by performing the below methods and operations.

The methods are as follows:

1. By Using The Official Windows Update

Usually, this particular method allows us to update our drivers as soon as the manufactures of the devices make them officially available. This is till now considered the most effective and efficient method to download the latest software and drivers for the stabilized versions and fixes. These particular updates are checked, tested as well as verified from Microsoft’s end to deliver the maximum potential and compatibility.

Steps Involved To Update Drivers From Windows Updates:
  1. The initial step involves opening settings in the control panel.
  2. We will select the option of update and security.
  3. Under that select the operation of Windows update.
  4. Click on “Check For Updates” to find all the available updates on the device.
  5. Just below the option of “Check For Updates” we will select operation for “View Optional Updates”. 
  6. A new window will open select the option of “Driver Updates”.
  7. Select all the driver updates available. Click on the tab of download and install.
Now while performing the above steps if we do not find any link or packages there are no updates available and your device is installed on the latest version of drivers.

2. By Using Driver Manager:

Usually, this method of updating the drivers is considered sophisticated and involves a lot of care and patience. By using this operation to update the drivers of the peripheral devices as the driver update was not available on the conventional Windows Update procedures.

For a novice user, it can be a breathtaking challenge to perform the steps involved in using the driver manager but the results and solution provided can be astonishing as well.

There can be multiple reasons for the Windows update to not display the available driver updates some of them can be:
  • The available update can be a beta version (testing update).
  • It may be possible that the manufacturer might not have a stabilized update for all its devices.
Also under this operation, you might need to extract .zip (compressed files) to perform the specific driver update that we want to.

Process Involved In Updating Drivers From Driver Manager:
  1. At the bottom left-hand side of the screen, we will see the “Type here to search” option.
  2. Type “Device Manager” and select the topmost result from the search list.
  3. Under the window of “Device Manager,” there would open a list of devices along with their drivers installed.
  4. Select the hardware or the peripheral for which we want to update the driver.
  5. Double click on the selected option.
  6. Select the particular hardware from the list of available options.
  7. Right-click on the selected hardware and choose the “Update driver” option.
  8. From the next window select the “Browse my computer for driver” option.
  9. Over the new screen, we can select the location from which driver files are present.
  10. Select the “OK” option to check for all the subfiles of drivers under the selected folder.
  11. Check for the particular “.inf” file for the driver file to load and update.
  12. Select the “Next” tab to update the particular driver file. Manual update of the driver is accomplished.
After performing the above steps the PC will automatically update the available driver to perform more efficiently and support all the available fixes involved.

3. By Using Bit Driver Updater:

Using this method and procedure to update the driver over PC is highly preferable and recommended. It makes the process faster and easier for a novice user as well to update the driver over the device. Using a good driver updater software is also necessary otherwise it might have many adverse effects on the overall performance as well.

As we all know for the better and smoother performance of the PC a driver updater usually performs the task automatically and keeps the device up to date and in a well-maintained state.

Benefits Involved In Using Driver Updater:
  • Ease of installing latest driver updates over Windows PC.
  • Less time consumed in the entire process.
  • More efficient and restore options also available.
  • Enormous database of driver software available to choose from.

Steps Involved In Updating Driver from Bit Driver Updater:
  1. Hower to the official website of the Bit Driver Updater and install it onto your device.
  2. Stand by until the software is downloading and initiating the installation.
  3. As the installation gets completed the software automatically launches itself.
  4. Effortlessly the automatic scan initiates itself.
  5. After the scan operation under the page, we will see a list of available driver updates.
  6. Click on the “Update Now “ button to seamlessly update the driver software.
After completing the above steps the newly available driver updates get easily installed over the device and ready to use.

Updating Driver On Windows 10: Final Conclusion

As we all know that updating our drivers and keeping our PC up to date is necessary and helps to improve the overall performance of the device as well. It is very important to keep checking for the available driver updates to maintain a seamless connection between the PC and the hardware connected. We can use either of the above operations to update our drivers and maintain a smoother overall experience while using the Windows 10 PC.

Hope, you'd check these interesting articles too:

AUTHOR_NAMEAbout the Author:
Ashutosh Goyal is a technical writer who writes detailed technology-related articles on topics such as best driver updater & PC optimizer software for Windows & macOS. His keen observational, learning, and researching skills make him write such content exceptionally despite being a person with non-technical background.

Best PDF Converters For Windows and Mac

Best PDF Converters For Windows and Mac
Looking for best PDF converters? Do you want to convert the format of file from PDF to any format? Right?

In this quick list of best PDF converter tools, we have covered tools to convert PDF files into various file formats both on Windows and Mac. Let’s discuss more here.

WPS PDF to Word Converter

Best PDF Converters For Windows and Mac
Try this online PDF to Word converter to turn all your PDF files into Word effortlessly. This easy, super-fast, and high-quality PDF converter saves a lot of your time working on smart conversion techniques. It keeps all edits of your PDF file and converts them into doc format for seamless results. You can use this tool to split or merge PDF pages for your PDF conversion. It supports various file formats including MS Word-Doc, MS Word-DOCX, Native Doc, and RTF. To change PDF to Word, you simply need to select the PDF file from your local storage and click on the Start button to initiate the conversion process.

PDFSimpli

Best PDF Converters For Windows and Mac
This powerful online PDF converter could work seamlessly in a browser on your Windows or Mac systems. It allows you to convert and edit any type of document easily. You can use PDFSimpli to edit existing Text with OCR to quick results. It also helps you create your own forms and sign contracts online. It offers customized PDF converter solutions for various businesses including medical, legal, tax and finance, real estate, human resources, and more. It allows you to convert PDF to various file formats effortlessly.

PhantomPDF

Best PDF Converters For Windows and Mac
PhantomPDF answers how to convert PDF to Word in an effortless manner. It works as a powerful PDF to Word converter online for free. You can use this PDF to Word file converter to easily create and edit PDF documents in few simple clicks. It helps you convert PDF to Word online on Windows, Mac and other devices. It offers easy to sync and collaboration amongst your team members while working on an important task. It offers numerous useful features to manage content after publishing it. Here, you can share the edited content and integrate it with cloud storage and ECMs. Use PhantomPDF to create, edit, and export PDF documents with ease.

Soda PDF Anywhere

Best PDF Converters For Windows and Mac
Use Soda PDF Anywhere to convert PDF to Word Files on windows and online. It is a reliable, portable and intuitive PDF converter software that can be used at home or on the go. It supports PDF 2.0 for effective results. It is meticulously designed to help you reduce heavy lifting. You can use this tool to change PDF to Word online with easy sync feature where you can process converting files at one system, save it in cloud servers and continue work on another device including smartphone and tablet. It allows you to convert PDF files to various file formats including HTML, MS Office, RTF, image, and PDF/A. It uses 256-bit AES encryption level security to keep your documents safe.

Anvsoft PDF Converter

Best PDF Converters For Windows and Mac
Use Anvsoft PDF Converter to convert PDF to Word Files on Mac easily. It supports conversion across various file formats. You can this powerful tool to convert scanned PDFs with OCR and more. For the easy conversion, you can specify page or page range. It offers batch conversion feature to save your time. It also offers advanced customization for output files. It preserves the original layout of the file including columns, text, and graphics after conversion to save your time. It supports multiple language options and offers easy operations. It is also compatible with Windows 8/7/XP/Vista.

EasePDF

Best PDF Converters For Windows and Mac
EasePDF is a 100% free and safe PDF online editor that helps you turn your PDFs in an editable Word document in a jiffy. It offers tons of useful features to manage and edit PDF files easily. You can use EasePDF to compress, split, merge, rotate, or edit PDF in an effortless manner. It helps you transform your PDF files into various useful formats. Here, it supports all major file formats including JPG, Word, PNG, Excel, and more. You can also use EasePDF to eSign PDF documents online. It comes loaded with 20 online conversion tools to deliver highly accurate results. It deletes all your converted files from its servers once you complete the process. It offers 256-bit SSL encryption to offer the highest security.

Try the above-mentioned converter tools if you want to convert your PDF files into various file formats. Don’t forget to share your experience once you use these tools.

Check out more!

AUTHOR_NAMEAbout the Author:
I am Lucy Taylor. I have spent several years writing on tech-related topics. Recently, I have researched PDF to Word converter software tools to list them in my latest article. In addition to my writing profession, I prefer to spend time going on long bike rides.

How To Protect Your PC From Viruses And Malware

Protect Your PC From Viruses And Malware
Knowing the fact malware threat is not limited to any user base or country, as it is looming large and causing serious data security threat, it becomes important to apply preventive measures. In this article, we have discussed a few simple yet most effective ways to protect your PC from viruses and malware.


Update Software

Outdated software brings you a lot of troubles. These troubles aren’t limited to performance issues, instead, it also causes security issues as well. If you are running on old software, then it’s time you should immediately update your system software. To do this, Windows sends you regular software updates which help you keep your system software up-to-date. In case you have missed these automatic updates, then you also update system software manually. To do this, follow these steps:
  • Go to Start menu and right-click on it to select Settings.
  • Once you are on the Settings page, select Update & Security option.
  • Next, choose the Windows Update option from the left pane.
  • Click on “Check for Updates”. It will help you find & install all available updates on your PC.

Protect Your PC From Viruses And Malware

Enable Firewall

A firewall is an effective security solution on your PC that keeps your system protected from malicious content coming online. It builds a security wall between your system and open network where it tracks and blocks all malicious content effectively when you are online. While it comes built-in on all Windows versions, not necessarily it comes enabled. Thus, you can consider enabling it on your PC along with antimalware software for complete security. To enable this feature, follow these steps:
  • Go to Start menu > Settings.
  • Select Update & Security.
  • Select Windows Security from the left panel.
  • Select “Firewall & Network Protection” option from the right panel.

Here, make sure the firewall is ON for domain network, private network, and public network.

Protect Your PC From Viruses And Malware

Scan System For Viruses

Next effective solution to keep the system protected is to scan your system storage on regular intervals. It will help you find and remove all malicious content on your device effectively. To do this, you can find an effective built-in security utility called Windows Defender that will run multiple scan types for effective security. To use this tool, follow these steps:
  • Go to Start menu > Settings.
  • Select Update & Security > Windows Security.
  • Select “Virus & threat protection”.
  • On the next window, click on Scan Options under Current Threats.

Here, you will find multiple scan options to select from including Quick Scan, Full Scan, Custom Scan, and Windows Defender Offline Scan. You can select one of these options as per your needs.

Protect Your PC From Viruses And Malware

Use Best Malware Protection Software

Using the best anti-malware software, you not only manage to keep your system safe from various malware threats, but it also helps you boost system performance with various features. While there are tons of these malware protection software available, you can choose one based on the advanced features it offers. Here, it should provide real-time protection to your system, it should provide database updates to keep you protected from existing & emerging malware threats, it protects your system from all malware & virus families, and more with best malware software.

Avoid Clicking On Unknown Links

You get tons of emails & messages a whole day from unknown senders. While a few of them are related to marketing & promotion, a lot of them brings serious security threats. Here, scammers and cybercriminals send you unsolicited attachments & links which could compromise your data & system security once clicked or opened. Thus, you should remain vigilant to these suspicious emails & attachments. You should strictly avoid clicking on links & attachments found in these emails and messages.

So, these were a few quick tips to keep your system protected from malware and virus threats. If you have encountered any such threat, then feel free to share how you dealt with it. You can also comment if you have more suggestions to fix malware issue on your PC.

More related articles:

AUTHOR_NAMEAbout the Author:
Gajendra Singh is working at Systweak, as an Digital Marketing Executive. His potential of writing is PC tips, Android and Mac and Windows software tricks and he is anxious in writing other technical blogs like best anti malware software tools. You can also find Gajendra on Facebook, and Instagram.

How To Record Desktop Screen In Windows

How To Record Desktop Screen In Windows
Using best screen capture and video recorder software, you can easily perform numerous tasks automatically to save your time. While there are tons of these tools available online, here we have shortlisted 5 best tools for you.

Also Check: How To Record PC Gameplay On Windows 10

1. TweakShot Capture

How To Record Desktop Screen In Windows
TweakShot is the best video capture software and advanced screen recorder that comes with tons of pre-installed features. You can use this tool to record video, capture screen, edit images, and more. Using this tool, you can record full screen, active windows, or rectangular area as a graphics file on your PC. It also works as an advanced image editor and offers numerous useful features like cropping, resizing, highlighting, and more.

Features:

  • Allows you to capture screen, record video, edit images and more.
  • Works as a powerful image editor and offers numerous useful features.
  • Helps you record scrolling screen to help you objects like webpage etc.
  • Screen color picker feature allows you to pick any color from the image and copy color code to make designing easier.

2. Movavi Screen Recorder Studio

How To Record Desktop Screen In Windows
Use this smart 2-in-1 screen recorder tool to record screen, video and more. It works more than a screen recorder and helps you edit videos as well. Using this tool, you can record desktop screen, record program activity, capture online videos, create your own videos, and do lot more things effortlessly. This outstanding screen capture software allows you to record Skype calls, streaming audio & video, movies, TV series, webinars, and lot more.

Features:

  • It helps you record sound and video in HD quality to deliver effective results.
  • Allows you to schedule recordings to record screen anywhere anytime.
  • Allows you to adjust framerate, volume, and multiple other settings.
  • Offers multiple video editing features to help you produce content for your blog.

3. ShareX

How To Record Desktop Screen In Windows
ShareX is complete productivity tool that helps you capture screen, share files, upload documents, and more. You can use this tool to record desktop screen, capture active window, record fullscreen, capture scrolling window, and more. You can use this tool to transparent screen region or create Gif from screen recordings. This video capture software for Windows allows you to auto capture screen as well to save your time.

Features:

  • Allows you to schedule and auto capture screen to save your time.
  • Helps you print recorded screen whenever you want.
  • Using this tool, you can upload image to host easily.
  • Perform numerous actions like recognize text (OCR), text capture (OCR), scan QR code, show file in explorer, and more.

4. CamStudio

How To Record Desktop Screen In Windows
CamStudio is free desktop recorder & streaming video software that is free and open source. It allows you to record screen and audio activity on your PC. Using this tool, you can create high-quality AVI videos. Furthermore, you can turn these AVI files into Streaming Flash videos (SWFs) using SWF Producer. You can use this tool to perform numerous tasks when t comes to screen capture and recording.

Features:

  • It offers screen caption options with your recordings whenever you want.
  • It offers Lossless Codec option to produce crystal clear results.
  • Free for commercial and personal usage.

5. SmartPixel

How To Record Desktop Screen In Windows
Use this free screen-recording software to capture screen, record videos, and edit videos effortlessly. Using its smart video editing features, you can create HD quality videos directly from your screen. Furthermore, you can create software tutorials, make game videos, webcam videos, and more.

Features:

  • Free and safe to download.
  • Works seamlessly with all Windows versions.
  • Allows you to record and edit videos to create HD quality videos in a jiffy.

Here, we have listed 5 best screen capture and video recording software that saves a lot of your time working automatically. If you know more such powerful screen capture & video recorders, then feel free to share in the comments below.

AUTHOR_NAMEAbout the Author:
Gajendra Singh is working at Systweak, as an Digital Marketing Executive. His potential of writing is PC tips, Android and Mac and Windows software tricks and he is anxious in writing other technical blogs as video capture software. You can also find Gajendra on Facebook, and Instagram.

How to Protect your Personal Data in Windows PC

Protect your Personal Data in Windows PC
With the release of Windows 10, researchers have started complaining about the way Windows 10 handles the privacy of its users. Cortana, Edge, Timeline any many such features have to face serious criticism for interfering user’s personal data. Now when Windows 10 users start knowing all about this they too become concerned about their privacy. If you too are among one such Windows 10 user, then do believe that you have landed at the right place. As in this article, we will discuss in detail the essential steps that a user needs to take for protecting his personal data in Windows 10.
Download Now: Download or Get Windows 10 Officially

Stop Syncing Of Your Data:

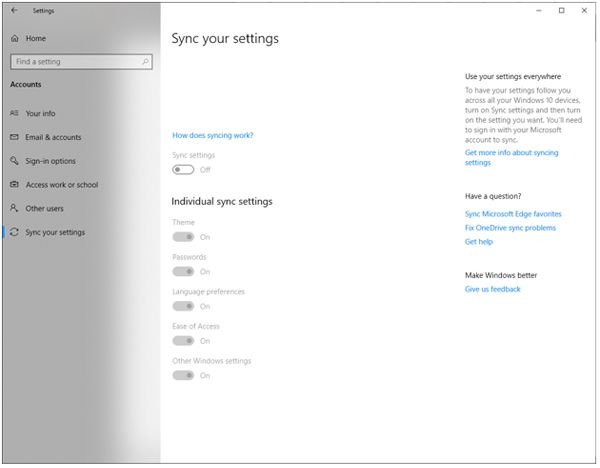
Syncing undoubtedly quite useful if you wish to keep yourself free from the hassle of signing again and again into various accounts on different PC. But on the contrary, it may also pose a threat to privacy. When we talk about Windows 10, syncing keep going in the background. Your passwords, username, activities all keep on syncing on all the devices that are signed in with a common Microsoft account. Now, if you sign in into any of your social accounts on your home PC then you do not need to input it again your credential for signing on that account on your Work PC (if both PC’s are synced.) But since in this article we are talking on how to protect your id, therefore, it is advisable to disable syncing of data. To do so please follow the below steps:
  • Click on Settings and head to Accounts > Sync your settings.
  • Protect your Personal Data in Windows PC
  • Now toggle off the slider to turn off syncing.

This will completely turn off the syncing, and none of your passwords and other details will be synced across different devices signed in with same Microsoft account.

Moreover, if you do not wish to completely turn off sync settings, then you can also turn off individual sync settings.

Go For A Local Account Instead Of Microsoft Account:

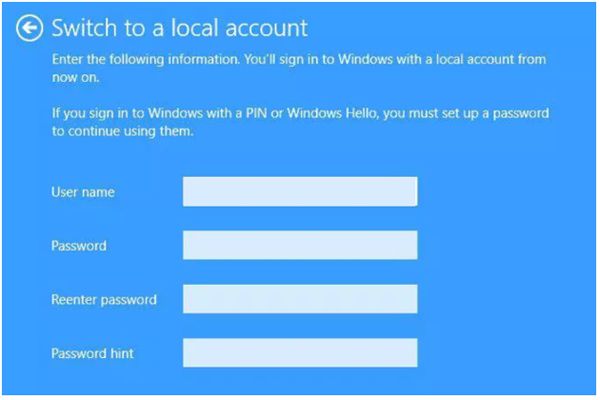
Most of the Windows 10 users use Microsoft Account for signing into their PC. As it is compulsory if you are trying to purchase the apps from Windows Store and trying to sync your data across various devices. But if you neither purchase any apps nor you wish to sync your data across various devices, then it is not necessary to continue with a Microsoft account, instead, you can go with a local account. This will help you to protect your personal data in Windows 10 as Microsoft will no more able to collect your personal info. Moreover, a local account is enough for creating a user name and password for your Windows 10 machine. To create a use a local account please follow steps below:
  • Click on Settings and head to Accounts > Your info.
  • Now click on Sign in with a local account instead.
  • Protect your Personal Data in Windows PC
  • Once done create a password and username for your computer.

Never Let Apps To Use Your Advertising ID:

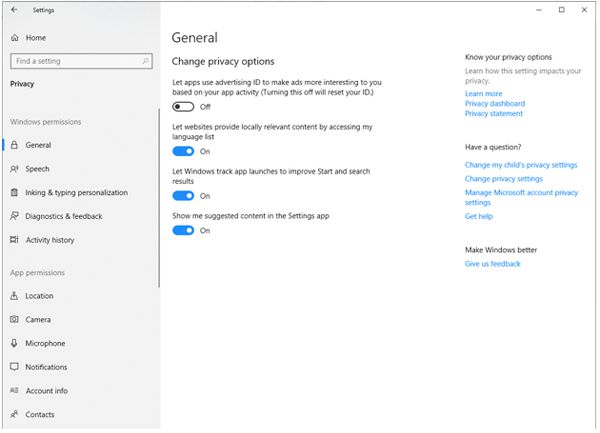
Many few Windows 10 users are aware that each Microsoft account that you used to sign in to your PC is assigned a unique advertising ID. This, in turn, helps companies to show you the personalized ads. And if you have syncing enabled then those personalized ads will follow you everywhere. To turn off these Ads you have to make some changes in the Windows privacy option. To do so please follow the below steps:
  • Click on Settings and head to Privacy > General.
  • Protect your Personal Data in Windows PC
  • Now toggle the option, “Let apps use advertising ID to make ads more interesting to you based on your app activity” to Off.
  • This will reset your advertising ID.

Turning this option to Off, though will not curb all the ads but you see the lesser number of personalized ads.

Disable Syncing Of Your Data On OneDrive:

OneDrive is a cloud solution provided as default by Windows 10 to automatically backup all your data to its servers. But if you are concerned about the security and privacy of your data or you are already using some other cloud storage program, then it’s not a bad idea to turn off the syncing to OneDrive. To implement it please follow the steps provided below:
  • In the System tray look out for the OneDrive icon and right click on it.
  • In the Setting tab, uncheck both the options, Start OneDrive automatically when I sign in to Windows and Let me use OneDrive to fetch any of my files on this PC.
  • Click on OK to proceed.

Now, none of your data is stored to OneDrive.

Disable Location Access:

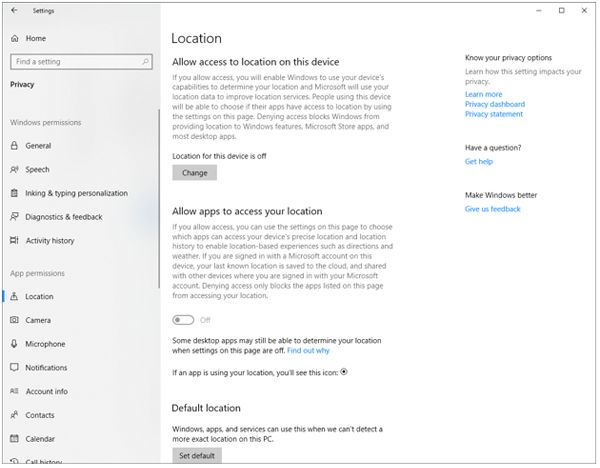
Access to your current location is another aspect that can be considered as an invasion of privacy. If you have location access enabled in Windows 10 then Windows and its various apps access that location and send location specific content. These can be like personalized ads, local news, etc. But once you disable access to your location, no one can get an insight to your current location. Moreover, you can easily disable your location by following the steps below:
  • Click on Settings and head to Privacy > Location
  • Protect your Personal Data in Windows PC
  • Now click on Change button and toggle off location for this device.

To stay more untracked toggle Off another setting that allows an app to access your location.

So, folks, hope that after finishing the article you will be able to handle your privacy in Windows 10 in a better way.

8 Free And Efficient Duplicate Files Finder For Windows

Efficient Duplicate Files Finder For Windows
Duplicate files generate in multiple forms on your device and occupy valuable disk space. Manual cleaning of these files may take lots of time and efforts. To deal with this problem, we have discussed 8 best duplicate files finder tools for you. These tools work efficiently on Windows to help you recover valuable disk space.

Duplicate Photos Fixer Pro:

Efficient Duplicate Files Finder For Windows
This simple yet powerful duplicate cleaner tool helps you find and clean all duplicate photos on your device. It supports multiple platforms including Windows, Mac, Android and iOS. Its powerful scan engines perform a deep cleaning of your system and help you find and delete all similar and exact match image files. After scanning your device storage, it displays auto-marked results. Here, all poor-quality files will remain marked to be deleted. Furthermore, it works efficiently with external devices.

Ashisoft Duplicate File Finder:

Efficient Duplicate Files Finder For Windows
This free and intuitive tool is designed to perform a deep cleaning of your device. Using this smart duplicate file remover tool, you can recover lots of disk space effortlessly. Its fast byte-to-byte comparison feature is useful enough to get instant and effective results. During the scan process, it searches for duplicate files based on content to deliver accurate results. It not only allows you to delete duplicate files, but you can also rename, move or copy the files. Its selection assistant allows you to mark duplicate files based on groups, drives, dates, folders and more. Furthermore, it allows you to move important files to Protect folders. Once you move files to this folder, the selected files will not be scanned for deletion. Its photo viewer feature allows you to view image files and compare them side-by-side before deletion. It works effortlessly on both internal and removable media devices.

Auslogics Duplicate File Finder:

Efficient Duplicate Files Finder For Windows
It offers the easiest solution to find and delete all types of duplicate files including music & audio files, videos, documents and other files. It works on powerful scan engines to help you de-duplicate even the largest possible files collection. This simple and free tool works on smart algorithms to compare files based on file name and content to deliver accurate results. Its industry-acknowledged exclusive technology is proven safe and effective in various tests.

AllDup:

Efficient Duplicate Files Finder For Windows
Working as a freeware tool, AllDup helps you delete all types of duplicate files instantly and effectively. You can use this tool to find, delete, copy or move duplicate files effortlessly. While searching for duplicate files, it scans files based on file extension, file name, file content, file dates and file attributes. Using its built-in viewer, you can preview files before deletion. Here, you can exclude JPEG files and EXIF data of files from deletion. Furthermore, it allows you to exclude entire folders or individual files from scan process. Here, it moves deleted files to recycle bin so that you can recover the files when needed. It supports cleaning of multiple device storage, drives, removable devices, media storage and more. It even allows you to export scan results to CSV or TXT file.

CCleaner:

Efficient Duplicate Files Finder For Windows
In addition to working as a complete system cleaner & optimizer tool, CCleaner also helps you de-duplicate your system storage. Using this tool, you can scan, detect and remove all types of duplicate files effortlessly. Its smart search techniques help you find duplicate files based on same file name, same file size, same date and similar attributes. It gives you a lot of filters to customize your search for duplicate files on your system. To access its duplicate finder option, you need to click on Tools icon > File Finder. Here, you need to click on the Search button to initiate the scan process.

Duplicate Cleaner:

Efficient Duplicate Files Finder For Windows
If you have your system storage cluttered with duplicate files then Duplicate Cleaner is the solution. This nifty tool works on powerful scan engines to scan and delete duplicate files even from the remotest corners of your PC storage. It allows you to decide location on your system to find duplicate files. It supports cleaning of multiple file formats to deliver efficient results. You can use this tool to sort out your image collection, tidy up your music collection, manage videos and more. It works efficiently both for pro and novice users.

Duplicate File Remover:

Efficient Duplicate Files Finder For Windows
Use this comprehensive media editor tool to sort all duplicate and original files with the highest accuracy. It helps you reduce the uneven space on your system that is acquired by multiple duplicate media files. It displays live status of file processing while delivering accurate results. Once it completes device scanning, it displays group wise results for easy management. It allows you to customize your scan process or perform a complete scan. It offers file editor and modifier with multiple editing tools and file browser. It allows you to skip scanning of selected files and move to another file when needed. Here, you can even customize folder selection to get instant results. It supports all major file formats and Universal Windows Platform to deliver flexible and accurate results.

Easy Duplicate Finder:

Efficient Duplicate Files Finder For Windows
Easy Duplicate Finder works efficiently both on Windows and Mac. It offers multiple custom scan modes and advanced search methods to help you refine your search process. Its ultra-fast search engines deliver results with 100% accuracy. You can use its preview option to view files before deletion for safer search. Furthermore, you can use its Undo button for emergency recovery of deleted files. It supports cleaning from Windows Media Player, iTunes, Photos app, iPhoto on Mac. You can also use this tool to clean files on Google Drive and Dropbox. Furthermore, it offers Wizard and Assistant for effective duplicate Photo management tool . Its smart scan engines protect the accidental deletion of important folders and system files.

Trying above mentioned duplicate file finder tools, you can easily recover chunks of disk space effortlessly. Here, we have discussed some of the best tools in detail. If you know more such tools, then feel free to comment below.

How To Manage And Eliminate Duplicate Photos On Your Hard Drive

How To Manage And Eliminate Duplicate Photos
Organizing and managing photos is not an easy task, especially when you’ve got over thousands of photos on your system. keeping unwanted numbers in your library not only slow down the performance of your machine but also hogs the majority of storage space. However, de-cluttering your library manually takes forever to give you a tidy and well-organized library but surely you can get your work done in real time using the third party duplicate photo finder and remover tools.

In this post, we’re going to share how to manage and eliminate duplicate photos on your hard drive using the Duplicate Photos Fixer Pro. However, before going further let's understand what is Duplicate Photos Fixer Pro and why do you need this?

What Is Duplicate Photos Fixer Pro?

Duplicate Photos Fixer is an easy, fast and powerful software which is capable of managing and deleting duplicate photos from your entire computer. This ultimate photo fixing program ensure effective scan to find out replica photos and help you to eliminate more photo by using the similar matches and various matching level.

Step 1: Download & install Duplicate Photos Fixer Pro

How To Manage And Eliminate Duplicate Photos
You can download and install the app from any browser just by typing the Duplicate Photos Fixer Pro in the address bar. You can easily get your hands on Duplicate Photos Fixer Pro from the App Store. You can also click on the link to download and install Duplicate Photos Fixer Pro directly on your Mac.

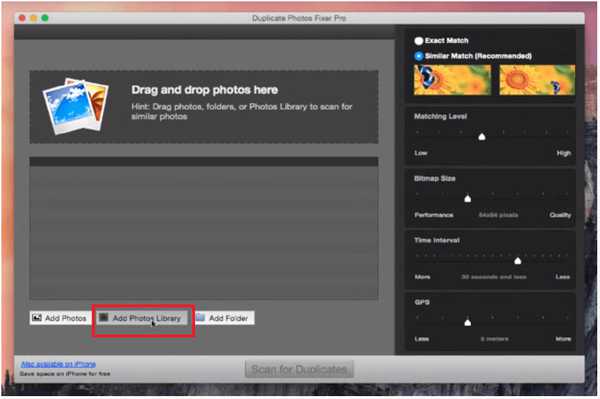
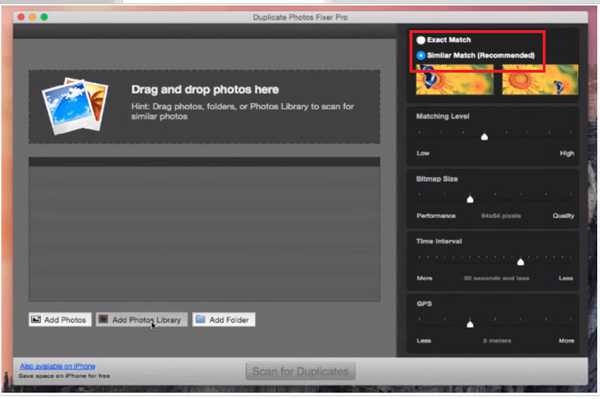
Step 2: Click On Add Photos Library

How To Manage And Eliminate Duplicate Photos
Now, you need to add your Photos library to find out how many duplicates you have in your Mac. If you have more than one photos library and you have duplicate photos in both the libraries, then you can scan both the library one by one. The app will not work effectively if you will add multiple libraries at the same time. You can add folder instead of any library as well.
Step 3: Choose Similar Matches or Exact Matches

How To Manage And Eliminate Duplicate Photos
Duplicate Photos Fixer Pro provides two different ways to find out duplicate photos with Similar Matches and Exact Matches. Similar matches will help you to get more duplicate as compared to exact matches. It is capable of choosing the photos which are duplicate with the slight changes. Exact matches can bring up the duplicate which has exactly same content. if the image has slightly differed from another image then if fall under similar matches. Using the similar matches, you can find more duplicate and it is recommended by created of the app as well.

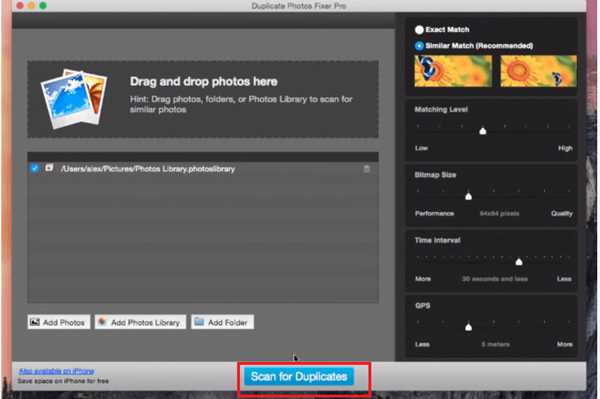
Step 4: Scan For Duplicates

How To Manage And Eliminate Duplicate Photos
Another step to finding and eliminate duplicate is clicking on the scan for duplicates. Once you will hit the scan for duplicate button then the app will start the scan to bring up all the duplicate you have in your machine. This option is available at the bottom of the Duplicate Photos Fixer Pro app.
Step 5: Step 5: Click On Auto-Mark (It is optional)

How To Manage And Eliminate Duplicate Photos
Using the auto-mark button is an optional way to eliminate the duplicate found by the scanning. It is a time-saving way to get rid of unwanted photos. Moreover, this method will help you to delete all the duplicate at once. However, you want to keep some of the photos and only interested in deleting a few photos then you can check-mark the photos manually to delete them.
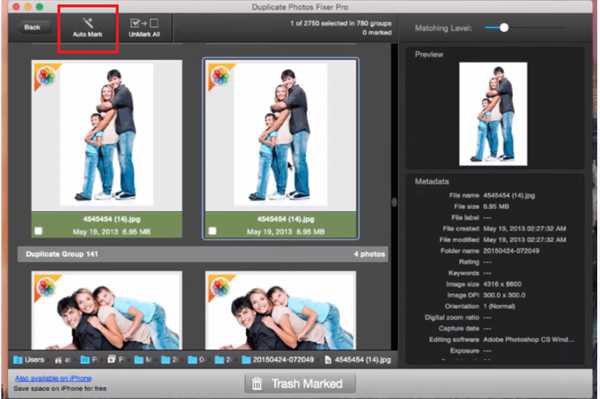
If you’re deleting replica files manually then please keep in mind, the photos available in red color is duplicate photos and green color photos are original photos. You need to check-mark the red photos as these photos are with fewer resolutions.

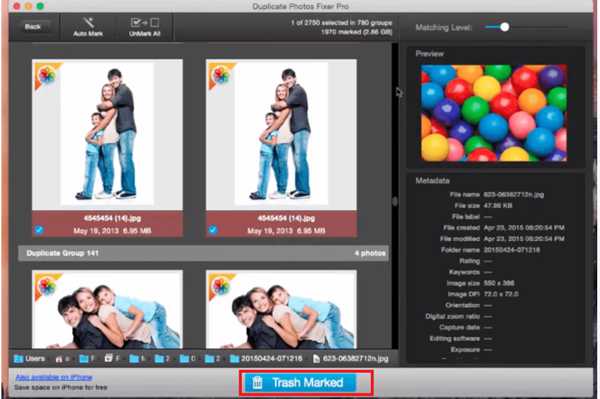
Step 6: Use Trash-Marked

How To Manage And Eliminate Duplicate Photos
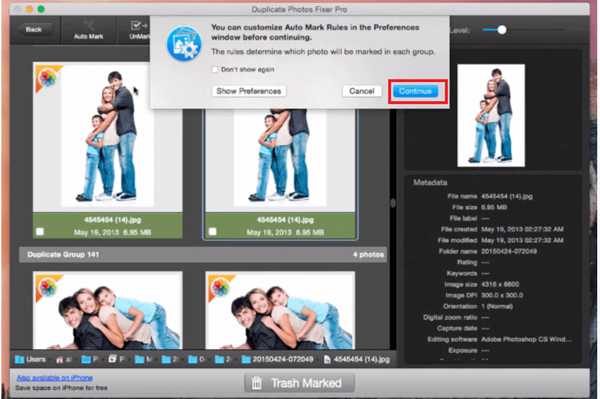
This option is to put all the replica files in the trash. However, before that, you need to follow some of the steps which you will get one by one. Please do not skip the instruction window as it is important to perform the steps to delete your replica files. Follow the below mentioned steps:

1. Firstly, you need to minimize the Duplicate Photos Fixer Pro and need to open your library at your machine. Now, you need to Show Sidebar.
2. Choose All Photos from the left-pane of your library.
3. Come back to Duplicate Photos Fixer Pro app and hit next, next and then continue.

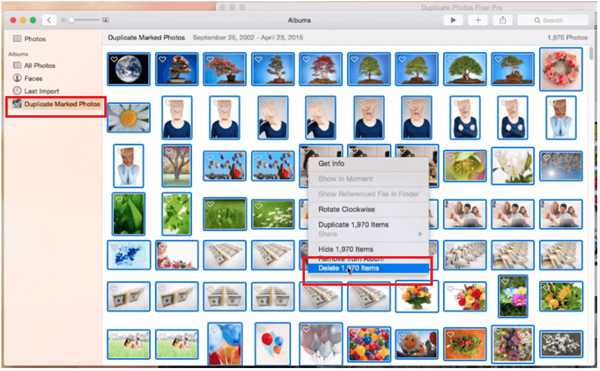
Step 7: Open Duplicate Marked Photos

How To Manage And Eliminate Duplicate Photos
You need to open duplicate marked photos folder from left-pane of your library. You can locate all the duplicates under this folder. Now, select one photo and press command + A (to select all the photos) and delete them. That’s it, you’re done now.

Now you don’t need to waste your valuable time in manually deleting duplicate photos from your Mac. All you need to do is, download and install is a powerful tool to clear up replica photos and save some storage space.