Showing posts with label Mac. Show all posts

How To Increase Your Mac Performance

How To Increase Your Mac Performance
Recently, Mac users have been struggling with slow performance a lot more than before. While software and hardware changes are to be blamed, buying a new device is not the only way to get greater speed. There are plenty of ways to boost the performance of your Mac without having to buy new hardware. Here are six ways to increase the performance of your Mac.

Check For Background Applications

Often the biggest reason for the drop in performance is CPU usage by background applications. By learning how to lower CPU usage on Mac, performance can be boosted overall. Plenty of applications enable background processing when they are installed. These applications start when you switch on your laptop and run even when you’re not using the application.

They either run in the background to reduce start-up times or collect some form of data. By closing these applications, their start-up time will be delayed but the overall speed of your Mac would be boosted. Regularly checking to see what all applications are running in the background can help in reducing CPU usage.

You can also get software that automatically checks for background applications and shuts them down. These kinds of software consume low energy and don’t affect performance speeds.

Manage Your Storage

Hoarding up a lot of data in your Mac will certainly slow it down. Instead of storing pictures, videos, and large files in the storage drive that also includes system files, store them on your secondary drive to improve speed. Another great way is to use an external drive or store all your data in your iCloud.

It is easy to retrieve and eliminates the stress exerted by large files on your Mac’s performance. Regularly check up on your storage and how much space it’s taking on your storage drive. Don’t store beyond 60-70% of your total storage space to maintain your storage drive’s health as well as keep your Mac’s performance high.

Clean Your Fans Regularly

Most thermal problems are due to dust collecting in cooling fans. Bad thermal management is one of the biggest issues when it comes to bad performance. Cleaning your cooling fans regularly can help in reducing air blockage and improve the cooling of components.

If you’re not confident at opening your Mac and cleaning it by yourself, take it to the nearest service station and get it cleaned by a professional. Make it a habit to check your thermals every now and then and clean your laptop at least twice a year. This will greatly help in maintaining good temperatures.

Clear Cache and Old Files

As mentioned before, storage can be a big reason for slow speed. To improve performance, it’s important you regularly clear out any large or old files from your system. You can either look for such files manually or use a cleaning software that detects large files that should be removed.

Cache is yet another form of data that takes up storage and slows your Mac. Cache is primarily useful in reducing boot time of applications and other processes. But it’s beneficial to clear them from time to time as often unused cache files remain stored in your drive. By removing them, you’ll free up a lot of space on your drive and boost your Mac’s performance.

Consider Changing Your RAM

RAM sizes are more than enough in new laptops but that isn’t the case with old Mac laptops. RAM holds temporary data to improve performance and make processes smooth. By changing your old RAM for a bigger RAM with more speed, you’ll notice a big difference in processes such as video editing, multi-tasking and booting.

You’ll find plenty of cheap options online if you wish to change it on your own. Or you can go to a laptop store and have it replaced by a professional.

Apply Thermal Paste

If your laptop is more than two years old, there are high chances that your processor’s thermal paste has now dried and is inefficient. Moreover, laptop manufacturers don’t always use good thermal paste for their lower-end models.

By applying the thermal paste on top of the processor, thermals will be a lot better and your Mac’s performance will get a big boost. Again, this process can be tricky to operate and it’s recommended that you get it done by a professional. If you’re doing it on your own, don’t buy the cheapest one on the market but the one that is most worthy of its price based on customer reviews.

Conclusion

These six ways are great and work really well in improving and maintaining the performance of Macs. As a user, regularly check on the CPU’s temperatures, clear old cache and large files and try to reduce your data storage. Practicing these steps will significantly boost your Mac’s performance.

Check out more article related to Mac:

Proven Ways To Keep Your Mac Cool and Active

Proven Ways To Keep Your Mac Cool and Active
Apple gives the users the benefit of working on a lightning-fast computing device. However, it’s the software and the hardware that gives you a super smooth working experience. But with persistent use, you may find that your device starts to overheat and act sluggish whenever you try to accomplish an important task.

These are everyday problems that every Mac user had to face. But, if you choose to ignore these issues, they can do some severe damage to your device, and you end up losing your device and the crucial data saved on it. So if you are also dealing with slow performance issues on your Mac, this short guide is for you.

To effectively deal with this problem to keep your de Mac cool and active, you’ll need to follow the instructions mentioned below. Let’s get started:

Make Sure The Fan Is Working Properly

A common reason for your Mac’s slow performance is the problem with the fan. Once the fan on the device starts to malfunction, your device starts to shut down unannounced. Every application you run takes twice as long to work. And this is not all. If you ignore the heating issue on your device for a long time, you may end up doing some severe damage to your device. Your hard drive can crash, and you will lose all the vital information you have saved on it.

For all these reasons, it becomes crucial to find the solution to this problem as soon as possible. Therefore, you can start by simply adjusting the fan speed of your device. To know how to control the fan speed on your device, you can follow this guide https://setapp.com/how-to/control-fan-speed here. Once you can adjust the fan speed, you can manually increase or decrease the fan speed whenever necessary. It’ll provide your device with a perfect reason to work efficiently. Further, enhancing the overall performance of your device.

Do Not Overcharge Your Mac

Excess of everything is bad. The same goes for your Mac. To keep your Mac cool and active, you need to be conscious of how much time you put your device on charge. Charging it in excess can put a strain on your battery that will ultimately decrease its lifespan. Moreover, it gives your device more reason to heat up, which affects the overall performance of your device.

To deal with this issue, you don’t have to follow a particular set of instructions. All you need to do is to be mindful of the duration you put your device on charge. So if you are working from home or office, make sure you turn off the charging as soon as you see the battery status above 80 percent. It will create a healthy charging routine for your device. This way, you’ll be extending the life of your Mac’s battery, which will save you from a lot of trouble in the long run.

To Sum It Up

If you are working on a Mac, there are many ways to enhance its performance. However, if you face a definite issue such as overheating of the device, make sure you handle it as soon as possible. Consequently, the fixes mentioned above will help you deal with Mac’s performance issues while giving your device to run smoothly for a very long time.

Best PDF Converters For Windows and Mac

Best PDF Converters For Windows and Mac
Looking for best PDF converters? Do you want to convert the format of file from PDF to any format? Right?

In this quick list of best PDF converter tools, we have covered tools to convert PDF files into various file formats both on Windows and Mac. Let’s discuss more here.

WPS PDF to Word Converter

Best PDF Converters For Windows and Mac
Try this online PDF to Word converter to turn all your PDF files into Word effortlessly. This easy, super-fast, and high-quality PDF converter saves a lot of your time working on smart conversion techniques. It keeps all edits of your PDF file and converts them into doc format for seamless results. You can use this tool to split or merge PDF pages for your PDF conversion. It supports various file formats including MS Word-Doc, MS Word-DOCX, Native Doc, and RTF. To change PDF to Word, you simply need to select the PDF file from your local storage and click on the Start button to initiate the conversion process.

PDFSimpli

Best PDF Converters For Windows and Mac
This powerful online PDF converter could work seamlessly in a browser on your Windows or Mac systems. It allows you to convert and edit any type of document easily. You can use PDFSimpli to edit existing Text with OCR to quick results. It also helps you create your own forms and sign contracts online. It offers customized PDF converter solutions for various businesses including medical, legal, tax and finance, real estate, human resources, and more. It allows you to convert PDF to various file formats effortlessly.

PhantomPDF

Best PDF Converters For Windows and Mac
PhantomPDF answers how to convert PDF to Word in an effortless manner. It works as a powerful PDF to Word converter online for free. You can use this PDF to Word file converter to easily create and edit PDF documents in few simple clicks. It helps you convert PDF to Word online on Windows, Mac and other devices. It offers easy to sync and collaboration amongst your team members while working on an important task. It offers numerous useful features to manage content after publishing it. Here, you can share the edited content and integrate it with cloud storage and ECMs. Use PhantomPDF to create, edit, and export PDF documents with ease.

Soda PDF Anywhere

Best PDF Converters For Windows and Mac
Use Soda PDF Anywhere to convert PDF to Word Files on windows and online. It is a reliable, portable and intuitive PDF converter software that can be used at home or on the go. It supports PDF 2.0 for effective results. It is meticulously designed to help you reduce heavy lifting. You can use this tool to change PDF to Word online with easy sync feature where you can process converting files at one system, save it in cloud servers and continue work on another device including smartphone and tablet. It allows you to convert PDF files to various file formats including HTML, MS Office, RTF, image, and PDF/A. It uses 256-bit AES encryption level security to keep your documents safe.

Anvsoft PDF Converter

Best PDF Converters For Windows and Mac
Use Anvsoft PDF Converter to convert PDF to Word Files on Mac easily. It supports conversion across various file formats. You can this powerful tool to convert scanned PDFs with OCR and more. For the easy conversion, you can specify page or page range. It offers batch conversion feature to save your time. It also offers advanced customization for output files. It preserves the original layout of the file including columns, text, and graphics after conversion to save your time. It supports multiple language options and offers easy operations. It is also compatible with Windows 8/7/XP/Vista.

EasePDF

Best PDF Converters For Windows and Mac
EasePDF is a 100% free and safe PDF online editor that helps you turn your PDFs in an editable Word document in a jiffy. It offers tons of useful features to manage and edit PDF files easily. You can use EasePDF to compress, split, merge, rotate, or edit PDF in an effortless manner. It helps you transform your PDF files into various useful formats. Here, it supports all major file formats including JPG, Word, PNG, Excel, and more. You can also use EasePDF to eSign PDF documents online. It comes loaded with 20 online conversion tools to deliver highly accurate results. It deletes all your converted files from its servers once you complete the process. It offers 256-bit SSL encryption to offer the highest security.

Try the above-mentioned converter tools if you want to convert your PDF files into various file formats. Don’t forget to share your experience once you use these tools.

Check out more!

AUTHOR_NAMEAbout the Author:
I am Lucy Taylor. I have spent several years writing on tech-related topics. Recently, I have researched PDF to Word converter software tools to list them in my latest article. In addition to my writing profession, I prefer to spend time going on long bike rides.

Easy Photo Editing Tips And Tricks - Every Mac User Should Know

Easy Photo Editing Tips And Tricks
Apple is known as one of the biggest company in this current market place. Their expert CEO team regularly updates their instruments to make their products better to use. This high technology product attracts customers and helps the company to make a high profit over the year. Apple product is also available online so that consumers can buy it smoothly. By using some effective strategy and the formula they became one of the largest companies in this world.

They already created a monopolistic market place. Apple’s Mac is another effective product. Some people strongly believe that a Mac computer is very effective to edit images and videos. Mac users have been using some handy photo editors to make their images more attractive. If you are a Mac user, you can follow some tips and tricks which will help you to get the best impressive results.

Don't Miss: Should Have Apps For Mac Users

Before Start:

First of all, you need to update the latest version of macOS software. Then, turn on iCloud Photos on your Mac to make sure that your required photos are available for retouching. iCloud Photos will help to keep your images organized. So, if you edit something on your Mac, it will also display on other devices. However, to edit an image, click twice on an image and then choose Edit in the toolbar. To get an edit view of an image, you can also click Command-Return. Then, you will get some effective options for editing.

Adjustment:

You can use some handy power tools to adjust light, sharpness, color, saturation, hue, tint, contrast, shadows, exposure, etc. By using sliders or clicking on the auto button, it is really easy to adjust these issues. By selecting the triangle next, you will get all the options the tool offers. If you are interested to use the adjustment from one image to another, you can copy and paste them. Choose the image that has the coordination you need then select Edit. After selecting the Edit button, click ‘image’. Then choose ‘Copy Adjustments’. Now, go back to the image you want to apply adjustments. Click edit and select ‘image’, then choose ‘Paste adjustment’.

Selective Color Tool Is Effective:

By using the selective color tool, you can shift green to blue. It is a brand new bludgeoning instrument in photos on macOS. One can easily synthesize the apparition of a specific hue. First of all, you need to custom hue by using the ‘eyedropper’. Then you can synthesize Saturation, Hue, and Luminance which will help to make your required changes. Selective color tool is also important to determine the color range of an image. Selective color tool in Apple’s photos app is more fast and usable than Photoshop. But, you can’t apply more than a single color in one image.

Note: More information about the photo editing, just click here.

Use Photos Extensions:

You can use Photos extensions to boost the potential of the apps. For Mac photo editor, you will find lots of extensions. They will help you to adjust images quickly and enhance images according to your requirements. For fast and automatic photo edit, Photo lemur tool is perfect.

This tool will help to apply amazing looks, fix saturation and adjust vibrancy. Aurora is a good choice for HDR bracketing. There are multiple professional tools such as Pixelmator, Affinity Photo, and BeFunky, etc which also work on editing photos. Mac users love to use some effective third party editing extensions for this image editor.

This third party editing extensions only designed for photos. They are found on the Mac App Store. You need to click on the right side of the photo to start editing with extension. You will find ‘edit with’ function in the drop-down menu. Click that option to continue.

Helpful: Manage And Eliminate Duplicate Photos On Mac

Use Edit Levels And Curves:

The levels tools help you to synthesize a photo’s shadows, black point, white point, highlight, and mid tones. You can switch between Luminance and RGB by using a pop-up menu. You can change the Red, Green and Blue areas individually.

A curve is a new tool to Photos on macOS High Sierra. It is almost similar to Photoshop. By using eyedropper tools, you can fix white, grey and black points. This tool is also effective to synthesize curve and adjust Red, Green and Blue channels.

Use Filters:

You can use light filters to get the more artsy look. It will not be a wise decision to use any filters you will find in the image editor. Try to utilize recognized image editor such as Luminar, Photoshop or Photo. Try to avoid those filters which will destroy your creation. The subtle way can be an effective process.

Crop And Grid:

The number of megapixels of your camera can’t ensure a high-quality image. You can crop your image to get better quality images.

Using the Rule of Thirds to create images is preferable. It is grid which can be found in lots of image editors like Apple’s own Photos and Luminar. If you don’t have sufficient time to frame your shoot, you can sure this kind of grid to achieve better composition.

Ask For Background Removal Services:

Photo background removing is an essential step to increase photo editing quality. Professional graphics editors are interested to utilize photo editing tools which help them to remove the background from an image. If the background of an image is not enough to fill up your need, you can adjust them according to your requirements by taking help from professional photo background removal services.

They use some modern graphics editor to reform shadows of background, adjust the brighten of the backgrounds, change shapes or fix colors. Photo editing experts use some necessary steps to remove background from an image. First of all, they receive a photo of their customers and download this photo.

Then, they send it to a personal local server. The expert team of the organization tries to select the path of all part of the photo. Another team create a unique layer or erase the background from an image according to the customer’s demand. You will find many background removal services which will help to get the perfect image.

If you like our tips, you can share this with your fellow friends.

AUTHOR_NAMEAbout the Author:
Salim Ahmed is the founder of Graphic Experts India, an offshore graphics house for Professional Photoshop Services. Besides, he is a Photographer and Blogger. He likes to share tips and tricks on Photography, photo editing, and graphic design!

7 Security Tips To Protect Your Mac Privacy

7 Security Tips To Protect Your Mac Privacy
Mac offers various built-in security features to keep your data security & privacy intact. Further, you can use reliable security software for your system to avoid all known and unknown virus threats. In this article, we have discussed top 7 security tips to protect your Mac from all privacy threats.
Must Check: Should Have Apps For Mac Users

Create A Standard Account (non-admin):

To start with follow this simple step to avoid troubles caused due to unnecessary administrator permissions acquired by different apps on your Mac. While administrator account (first account) has all necessary permissions on your system having a second standard account to perform day-to-day tasks is advisable. Standard accounts come with certain limitations to change or edit settings in the system. Once you are using the standard account to log in different apps that require administrator privileges will ask you for administrator details. Thus, it is useful feature to keep tab on unnecessary permissions acquired by different software & apps on your Mac.
7 Security Tips To Protect Your Mac Privacy
Source: upenn

Disable Automatic Login:

If you are using certain account on your Mac to automatically log in then it’s time to disable this setting. Automatic login may help you access your system instantly and with ease but it carries certain security & privacy risks. Here, you need to tell your Mac to display a login screen on boot to access system. To disable automatic login, go to System Preferences > Users & Groups > Login Options and turn off automatic login option. Alternatively, you can go to System Preferences > General tab and click on Disable Automatic Login option.
7 Security Tips To Protect Your Mac Privacy
Source: apple

Use Strong Password:

Using strong password to access your system will not only help you protect from curious onlookers but it will also secure your system from malware threats. Always prefer to set strong password with combination of letters, numbers, special characters etc. Once you have set strong password, it will hard for anyone to access your system data or settings.
7 Security Tips To Protect Your Mac Privacy
Source: kaspersky

Use Reliable Anti-Malware Program:

This is another quick step that helps you protect your device security & privacy in addition to improving your system performance. Using reliable anti-malware tool helps you protect your system from all known and unknown threats effectively. Here, these tools work on smart algorithms to find and remove all security threats effectively. One such tool is Systweak Anti-Malware that is designed meticulously to protect your Mac from all security & privacy threats.

You can get it from here.

Avoid Open Network:

Open network or free Wi-Fi may sound attractive when you desperately need to access your accounts online but it carries lot of troubles with it. Open networks could easily have breached with small piece of malicious software to threaten your data security & privacy. Here, malicious coders then steal your data or infect your device with virus to cause more trouble for you. Thus, it is always advisable to use encrypted and password protected network to perform all online activities. Further, use strong password for your network and do not share it with anyone. Even if you want to use open network or free Wi-Fi avoid sharing sensitive information on that.
7 Security Tips To Protect Your Mac Privacy
Source: howto-connect

Avoid Unknown Links:

Sending malicious links masquerading original websites and with other tricks is an age-old technique to spread malicious content across globe. Here, you may receive email attachment asking you to have won millions or asks you to click on the given link to fix some issue etc. Here, all these tricks are ideally there to trick you to click on malicious link. Thus, you should always cross-check the links or websites you open and be aware of unknown and suspicious links.
7 Security Tips To Protect Your Mac Privacy
Source: mtchnoworld

Enable Firewall:

Firewall comes pre-installed on all system but not necessarily it comes enabled. To enable Firewall on your Mac, go to System Preferences > Security & Privacy > Firewall. Here, first, you need to click on the padlock icon in the lower-left corner and mention the administrator account details Once mentioned, click on “Turn on Firewall” option to enable Firewall on your Mac. To change Firewall settings simply press on “Firewall Options”.
7 Security Tips To Protect Your Mac Privacy
Source: macworld

Conclusion

Using built-in security features is one effective way to protect your Mac and data security & privacy intact. In addition to these built-in features, you can also try third-party security suite for reliable results. You can follow above-mentioned steps to protect your Mac from all security & privacy threats.

AUTHOR_NAMEAbout the Author:
Apoorv bhatnagar is working at Systweak Software , as an SEO analyst and technical Content Writer. His potential of writing is PC tips , Android and Mac tricks and he is anxious in writing other technical blogs. You can also find Apoorv on Facebook and LinkedIn.

Speeding Up A Video With Movavi Video Editor

Speeding Up A Video With Movavi Video Editor
At first glance it may seem as if speeding up a video using a ‘fast forward’ style effect is of limited use – but nothing could be further from the truth. It is actually an effect that is widely-used in videos and movies and depending on the circumstance can make your video look comedic, create a fast-paced action sequence, or even just speed-through part of the video so that it takes less time.

In short it would definitely pay to be able to speed up your video, and frankly it really isn’t that difficult to do using Movavi Video Editor. If you want to get started, just follow these steps:
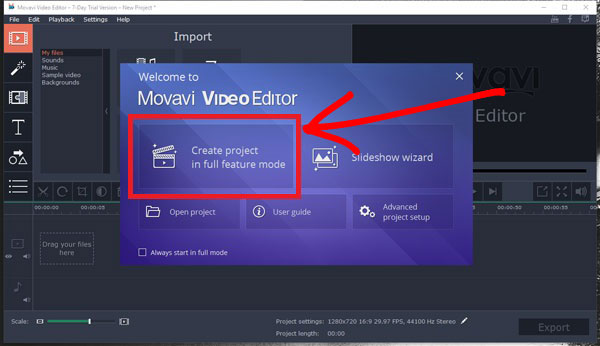
  1. Launch Movavi Video Editor and select ‘Create project in full feature mode’ in the menu.
  2. Speeding Up A Video With Movavi Video Editor
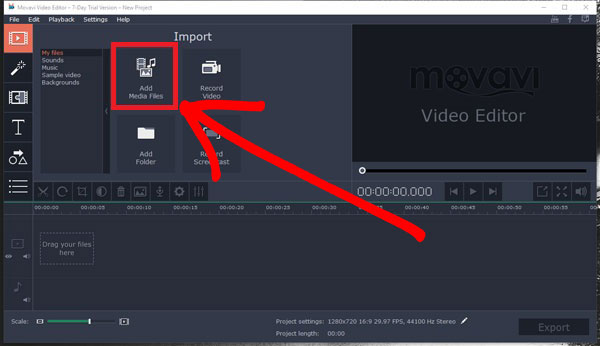
  3. Click on the ‘Add Media Files’ button and select the video that you want to speed up.
  4. Speeding Up A Video With Movavi Video Editor
  5. Click on ‘Clip Properties’ (i.e. the ‘cogwheel’ icon), and move the speed slider to the right to increase the speed of your clip.
  6. By speeding up the clip the audio will also play at an increased speed – which you may want to fix. To do so you can click the ‘Mute track’ button (i.e. the ‘speaker’ icon) and then add the original audio track again or add a new audio track of your choosing.
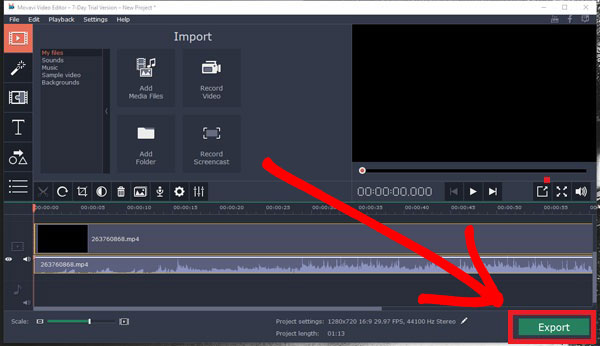
  7. Click ‘Export’ when you are satisfied to save your video.
  8. Speeding Up A Video With Movavi Video Editor
As you can see using the fast forward video effect in Movavi Video Editor is really a piece of cake. The only ‘tricky’ part may be deciding how you want to deal with the audio – which is something that you’ll have to do on a case by case basis.

If you really want to make your video look impressive however, it would help to explore, experiment with, and learn how to use the other features in Movavi Video Editor. One place to start is by using its features to process and edit the video footage so that you can cut and merge video clips, rearrange the sequence in which they appear, improve the video quality, and fix common problems.

After you’re comfortable processing video footage, you can move on and start to explore the various other features present in Movavi Video Editor. As you go along you’ll discover how to apply special effects and filters, utilize audio effects, insert stylish animated transitions, add customizable text, and more.

Assuming you spend a few minutes trying out and playing around with the numerous features in Movavi Video Editor, you’ll soon find yourself able to make full use of them. From there on out it is just a question of deciding how you want to edit your video, and using the tools available to do so.

Top 5 Reasons: Why PCs Are Better Than Macs?

Top 5 Reasons: Why PCs Are Better Than Macs?
Top 5 Reasons: Why PCs Is Better Than Macs?
We are all aware from PC and Macintosh computers. It’s 21st century, and there’s no any third type of computer that we use the most. Only PCs and Macs are popular now and people prefer to use them as their wish. Everyone has their own different thinking. Some people prefer to buy Mac, but some prefer to use PCs. Both computers have their own features and benefits. But here I’m gonna highlight 5 reasons ‘Why PCs are better than Mac?’

It’s not that only PCs are better. Macintosh computers have their own features which make them better than PCs. Well! Today my aim isn’t to write this article to hurt Mac users. If any Mac user says that only Macintosh is better or any PC user says, just PCs are, so it’s wrong. Both have their own features, advantages or benefits.

Macs Are Expensive

Yes! No doubt Macintosh are much expensive than PCs. Middle class or lower class users can’t afford them. If you go to the market to buy PC, so you can get latest one like Hp, Dell, Lenovo etc with 5th generation, 8 GB ram, 1 TB HDD, 256 SSD and 4 GB Graphics card in maximum or almost $1000. Even if you build your own manually PC then you can build easily in $1200 to $1500. But if you buy a Mac with same configurations then you have to pay maybe $5000 for that. So you can imagine, how much the Mac is expensive. Almost 5 times expensive than PCs.

If you didn’t believe that how much the Mac are expensive then see below image. The difference between them is cleared.

Top 5 Reasons: Why PCs Is Better Than Macs?

Mac Isn’t For Gamers

Yeah! It’s useless for gaming lovers. Mac is a such platform where you can do everything that we normally do on computer, but you can’t gaming on it. You can enjoy it’s built-in operating system games, but not reality-based games. So in this fact, PC is much good. It can handle highly optimized and high graphics games easily. In today’s era, no one is there yet which can provide better graphics than PC, even Xbox or Playstation can’t.

So, if you’re a gaming lover but wanna work as well as gaming then Macintosh platform isn’t for you. You should choose PC platform must. Otherwise, you are wasting your money.

Doesn’t Support To every Software

Windows programming is very similar to games. So the same is valid with Mac. There are lots of programs that Mac supports, but not all. Sometimes, Mac users have to face trouble while installation of any program. So in this situation, it’s very sensitive. But PC’s world is a blowout of free and shareware, free downloads that do pretty much anything. Normally, on Mac you have to need to change the settings to introduce anything that isn’t sanction by Apple itself. It implies the product all functions admirably, yet the decision is constrained.

Sometimes Is Risky In Security Issues

If you have in mind that Mac is the most protected and highly secure place where you can store your data feel free then it’s not true. Every device which is connected to the internet, never be safe itself. We have to make own safe and secure.

Yes! It’s right that Mac’s softwares and applications are more secure and free from any type malware than PCs. But not all. Most people think, there’s no need to use an anti-virus in Mac. But as we know, the world of the internet is now full of viruses and spamming links. So, no anyone else is now safe. We must have to need an antimalware and third party firewall applications to make our devices more secure and safe.

So if you think, Mac user is safe then it’s a wrong fact.

We Can’t Upgrade Mac

The most highlighted hated stuff is, we can’t actually upgrade Mac devices. PC users can upgrade their devices time to time as wish. But Mac user? NO. So in this fact PC is better and affordable for every class people even lower class also. So before buying, please be sure and confirm, Which device is compatible in both of them or Which device is affordable for you.

I’m not saying here that Mac is totally useless. You know what this device is still my dream. Whenever I think about to buy Mac then due to any issue, I’ve to burial my intent. So still dreaming about to buy it. So I’m now clearing again that both devices have their own features and benefits. But today this article is totally based on negative fact about Mac. So at the end of this article, I wanna sorry to all Mac users for hurt. :p That's it!

Should Have Apps For Mac OS X Users

Should Have Apps For Mac OS X Users
Finding the best applications is sometimes quite difficult. So the people who are Mac OS X users and looking for the best apps for their Mac so don’t panic. Here I’m sharing my gathered list of applications that every Mac OS X user should have.

For Emails:

1. AirMail

Should Have Apps For Mac OS X Users
Airmail app is a very simplified for those who are connected with the world of internet. The app is newly designed as Yosemite. It’s design and style very similar to the Yosemite theme. Basically, this app is helpful for quick mailing, messages, data uploading to Google Drive, Dropbox, CloudApp etc. If we talk about its visuality so theme is multiple and simple from every terms.

2. Mac Mail

Should Have Apps For Mac OS X Users
Mac Mail is an officially provided app, as we know. People prefer to use this app, but not all. This app has several shortcomings and deficiencies which make this lower class app as compared as other apps. But still people use it and they believe that this is the best and trusted among all.

For Pictures & Images:

1. Inkscape

Should Have Apps For Mac OS X Users
Inkscape is an open source drawing app with different and unexpected features. Some supported SVG features are included in latest version like basic shapes, markers, transforms, grouping, text, paths etc.

Further, Inkscape also supports creative common meta-data, node editing, layers, complex path operations, text-on-path and SVG XML editing. It also imports several formats like EPS, postscript, JPEG, PNG, BMP and TIFF and exports PNG as well as multiple vector-based formats.

2. Adobe Photoshop

Should Have Apps For Mac OS X Users
Adobe Photoshop, who isn’t familiar from this app. One of the most popular and preferred application in the world. The latest one is Adobe Photoshop CC 2015. Abbreviation of CC is Creative Cloud. I use it also and so I would like to prefer this one to other users also. But, it’s not free. You must have to pay for it, almost $20 per month.

3. Pixelmator

Should Have Apps For Mac OS X Users
This is another most innovative, fastest, full-featured and powerful image editing app for the Mac that has everything you need to create and edit your images. It’s very powerful and fast for Mac users. You can enhance and touch up photos, sketch, draw and paint, add texts and shapes, apply dazzling effects and do so much more. So get latest one version from official site, but you have to pay $29.99 for this.

For Writing:

1. iA Writer

Should Have Apps For Mac OS X Users
iA Writer is a consummate application for writers and bloggers. This app helps to make your writing style more attractive and also guides while typing. It’s design and style very simple. It’s not a heavy app, so that’s why it doesn’t reserve huge part of your CPU usage.

So for a very comfortable and helpful app that you’re looking for writing then check out iA Writer and must use. Hope, you won’t need another app after using it.

2. FocusWriter

Should Have Apps For Mac OS X Users
As I said for iA Writer, if you’ll use it then you won’t need to use another writing app. But a user don’t wanna try it then FocusWriter is second recommended app for them. FocusWriter is a very simple and plain light app that provides an excellent writing environment for writer which causes to feel comfortable while writing for every writer. This app is available for all operating systems including Linux.

For Privacy & Security:

1. CCleaner

Should Have Apps For Mac OS X Users
CCleaner is a tool for system optimization and security. It offers to do free space from your hard drive and also helps to remove your internet cache, browsing history, saved password (if you want to remove) etc.

As we know, when we install any application or software then after the removing of it some files still present in the system that we can’t remove by using control panel. So to remove these types of files, CCleaner is an open source tool for every operating system especially for Mac and Windows users. It’s available in both free and paid. In my views, everybody should have this one great tool. So must try it and also recommend to others.

2. KeePassX

Should Have Apps For Mac OS X Users
KeePassX is not very similar to CCleaner, but its work is great. This application helps to remember such passwords which are necessary for us like logon passwords, social accounts passwords, online passwords etc. So whenever if we forget passwords then in this difficult situation, KeePassX will help you and provide you password that you’ve forgotten.

3. Hotspot Shield

Should Have Apps For Mac OS X Users
Hotspot shield VPN is a secure and capable web security for your mac machines. It pursuits your information sent and got over the internet and secures your individual information, including Mastercard data, passwords, downloads and texts.

For Videos:

1. VLC Media Player

Should Have Apps For Mac OS X Users
VLC is the most using multimedia in the world. This tools offers to play videos of lots of formats like MPEG-1, MPEG-2, MPEG-4, Divx, Mp3, OGG etc, additionally DVDs, VCDs and different streaming conventions. The latest updates make it much easy and fully featured. You can also run Youtube videos in VLC.

2. HandBreak

Should Have Apps For Mac OS X Users
HandBreak is another should have tool. It’s basically a video converting tool. Users can finely convert their videos to any formats in few moments. Additionally, it’s free and an open source application and compatible for just Windows and Mac OS.

For Virtualization:

1. Virtual Box

Should Have Apps For Mac OS X Users
Hope, you’re aware about virtualization. If you’re not then visit this Wikipedia link and read about it in deep. Well! Virtual box is a very simple and finely optimized application for virtualization. Every Mac user can use it and run other operating system like Windows OS etc with Mac OS X as well. It’s free and open source virtualization application. So try this and give your views about it. While using, if you face any type of problem then must share via comment below.

2. Parallel Desktop

Should Have Apps For Mac OS X Users
Parallel Desktop offers to run 2 operating systems together except your default installed Mac OS X. So it’s simplest, quickest and very effective for running Windows on Mac without rebooting.

3. VMware Fusion

Should Have Apps For Mac OS X Users
VMware is an alternative application of Virtual Box. Suppose if you face any problem with Virtual Box then VMware is second choice. Both have almost same features. So don’t panic while choosing that which app you should use. You can select anyone else blindly.

For The Internet Browsing:

1. Google Chrome

Should Have Apps For Mac OS X Users
One of the most used Browser in the World is Google Chrome. As of January 2015, StatCounter estimated that Google Chrome has a 51% worldwide usage share of web browsers, indicating that it is the most widely used web browser in the world. People choose Google Chrome for their computers as a default browser because of it's fully trusted features that are free from any malware and spam. It's also a most safer browser due to it's best security and privacy extensions. If you're a Chrome user and want to find it's best extension then you can visit this article of Best Privacy & Security Extensions For Chrome.

2. Mozilla Firefox

Should Have Apps For Mac OS X Users
Mozilla Firefox is on second in the world after Google Chrome. This browser is an alternative to Chrome, that we can say. It doesn’t reserve in large amount of memory as compare with Chrome. Mostly low-end users prefer to use it. It has many features which make Firefox best alternative to Chrome.

3. Opera

Should Have Apps For Mac OS X Users
Opera is an another light, simple and fast browser. It hasn’t so many add-ons like Chrome or Firefox. But it’s fully supported and reliable. Opera never reserves huge system memory that’s why it’s perfect for low-end computers.