Showing posts with label Windows 10. Show all posts

5 Computer Maintenance Tools To Fix Windows 10 Errors

5 Computer Maintenance Tools To Fix Windows 10 Errors
Windows 10 is a significant improvement on previous versions because it is better equipped to boost speed. However, there's a lot of bloatware and junk files that will sit on your system after some time. Errors also occur due to various reasons.
Don't Miss: How To Free Up Hard Disk Space In Windows 10
So here is a list of the best tools you can use to correct system errors and speed up your PC.

1. Iolo System Mechanic Professional

This PC optimization program comes in freeware and premium version which they call the Pro version. The pro version has modules that include antivirus, Windows customization, internet connection tweaker, and search as well as recovery tools.

This program ranks top because even its freeware version packs some essential maintenance tools that can help fix several common system errors and make Windows faster. The Iolo System Mechanic Professional is easy to use with a simple and intuitive user interface.

The interface shows an overview of the system’s status which tells you the issues that need fixing such as registry issues, fragmented hard drives, and junk files. The junk file cleanup tool scans the whole system and erases obsolete files.

The program also has a registry tuner file although Windows 10 is more capable of taking care of the registry compared to its predecessors, so registry issues are not going to be as prevalent as you saw in previous Windows.

The main features of this program include:

  •  Looks for system errors and performs repairs
  • Finds startup programs that load without user knowledge and notifies the user
  • Increases browsing speed by optimizing hidden internet settings
  • Cleans disk to remove over 50 types of hidden junk files
  • Protects the privacy by safely deleting browsing history and cookies
  • The Pro version also offers protection from malware and the option to recover data.

2. CCleaner

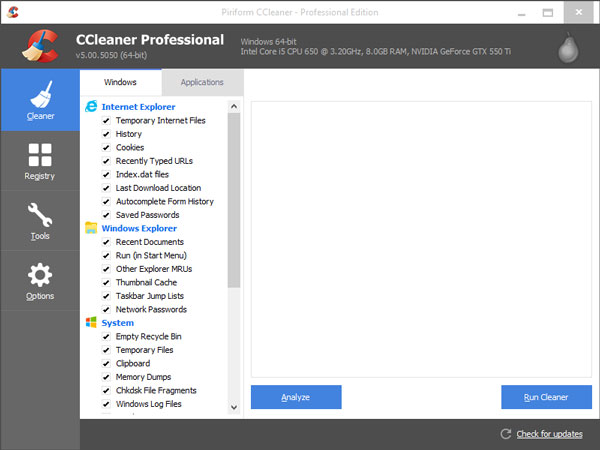
This is another effective PC optimization software with thorough cleanup tools. It is sufficient for removing software to free up space, managing startup items and repairing errors.

The CCleaner also comes in freeware and paid versions; both are excellent at cleaning the system and repairing errors.

This program conducts system scans and uses its registry and hard disk cleaners to remove any unwanted files that are causing errors or slowing down the PC. You can also set this easy to use optimization program to exclude some files while running its scans.

CCleaner can also scan third-party applications and has browser extensions to manage browser add-ons for optimal all-round performance.

The paid version also includes:

  • RAM optimizer
  • Shortcut Fixer
  • Defrag tool

3. FixWin10

This is a free program that fixes issues with windows 10. The program has six functionalities; each tackles a specific part of the system like File Explorer and system tools. All the features can deliver fixes for over 10 issues.

When using this tool, always start by creating a restore point to avoid losing any information. The program scans and fixes problems with files and folders. It also scans the system including the task manager, registry, and device manager and corrects any errors and issues.

FixWin 10 has a great user interface with standard fixes displayed for the start menu, office programs, wifi and listed under the Windows 10 section.

If you recently upgraded to Windows 10, this program has a section that specifically fixes problems that occurred as a result.

The windows troubleshooter is also easy to understand and can offer fixes for:

  • Printers
  • Speakers
  • Internet
  • Windows update

4. SlimWare Utilities SlimCleaner Free

This tool cleans up the system and also collects data from its user base to recommend optimal settings for PCs. It is compatible with Windows 10, 8, 8.1, 7, Vista and XP.

It has some unique capabilities too, like power consumption options and ability to check if the antivirus software is outdated.

SlimWare Utilities SlimCleaner Free the best free utility software that boosts performance because of its friendly user interface and many useful and unique capabilities including:
  • System optimization- Looks for system errors and applies fixes
  • Software cleaning and optimization- Scans software to remove junk and fix errors
  • Browser tools- Tell you about homepages, extensions, add-ons, plug-ins, and toolbars
  • Disk tools- Audits files and offers options like shredding and deleting junk files
  • Windows tools- Looks for errors and performs repairs on windows
  • Hijack log- this lists all programs vulnerable to third party attacks

While its option to delete junk files is useful, you cannot mass delete with this tool. You need to erase one item at a time.

5. IOBit Advanced System 9 Free

This program makes a noticeable difference in PC performance. It features an intuitive health monitor that provides system information at a glance. That would be enough reason for it to rank higher on the list but it does not come with a shredding tool.

IOBIT comes in freeware, and paid options and both give a respectable performance when it comes to cleaning up the areas that clog up the PC and cause it to slow down.

The free version comes with the following features:

  • System optimization
  • Backup and restore
  • Privacy protection
  • Start manager

The Pro option comes with additional security features like malware protection. However, there are better antimalware options out there, and some of them are free.

Conclusion

Another common problem with PCs can be outdated drivers. These can cause program malfunctions and some crashes, so you need a tool to ensure your drivers are always up to date. You can also try manual checks, though those will take time because you never know when updates are released.

A fast and healthy PC can only be maintained by keeping out the bad stuff. Anything that risks information or slows down the PC is an enemy. These include malware and bloatware. With an antimalware service and proper internet use, you can avoid slowing down your PC for a long time.

How To Record PC Gameplay On Windows 10

How To Record PC Gameplay On Windows 10
While using Xbox app on Windows 10, it allows you to record your favorite moments in game effortlessly. Here, you can take screenshots, capture clips, record PC games, trim them and even share them with your family & friends. It gives you freedom from buying extra recording gear. It allows you to share your clips on social media accounts and on Xbox Live.
Don't Miss: Get Ready Or Optimize Windows 10 For PC Gaming

Record What Just Happened:

Windows 10 allows you to record what recently happened during the game. Here, you can record last 30 seconds of your running game. To do this, first launch your game and press Windows logo key + G keys on your system keyboard to open Game Bar. Now choose the Settings > Record Game in the Background. To quickly record last 30 seconds game simply press Windows logo key + Alt + G while Game Bar running in the background. Here, last 30 seconds of game will be saved as game clip.

Record What’s Happening:

Apart from last 30 seconds recording, you can also record what is happening during game. Here, you need to press Windows logo key + Alt + R keys to start a recording. You need to press same button once recording is completed. Here, you will see a screen flash when you start recording or end it.

If you can’t record game using these shortcuts then go to game’s Settings and check for the option to run the game in a window. Now when game is running in a window, press Windows logo key + G and choose “Yes, this is a game” option. Now it will allow you to use shortcuts when the game is full-screen again. This built-in feature works as a great game recorder software feature to reduce your manual efforts.

Trim To The Best Parts:

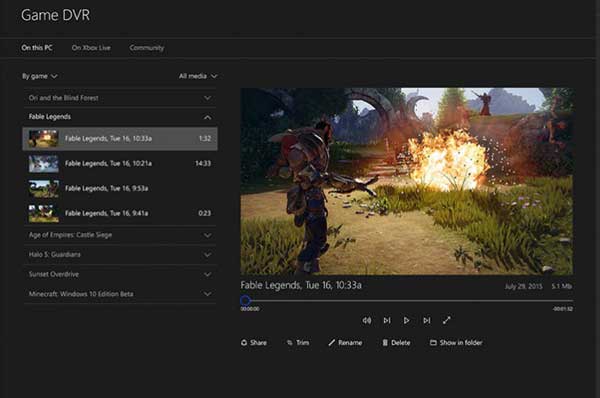
Now when you have game recording, you can even trim your favorite parts to store. Here, you can highlight the best parts of the game or focus on a specific moment by trimming it in the Xbox app. To do this, open the Xbox app on your Windows 10 system and choose Game DVR option. To find all recordings done through Game bar you need to go to “On this PC”.
How To Record PC Gameplay On Windows 10

Share It With Your Friends:

The best part of the recording process is, you can share your favorite recordings with your friends and family easily. It allows you to share your recording clips and other screenshots on different networks and platforms. To do this, select “Open folder” option to view all your recordings. Now simply select the files and upload them to your favorite social media platform. You can even directly share it with your friends.

Further, you can share your clips directly on Xbox Live, to do this simply click on “Share” to upload it to Xbox Live. Here based on your privacy settings your friends and family can enjoy the clips. You can view all shared stuff when you sign in to Xbox on other devices.

Conclusion

Its great idea to capture moments of your favorite game on your Windows 10 system. Here, it not only allows you to capture recordings but it even helps you trim favorite shots and share them on a social media platform. You can use built-in feature on Windows 10 to enjoy all this.

How To Delete Windows.Old Folder In Windows 10

5 Important Ways That Social Media Can Boost Your SEO
So you have recently upgraded your computer to the latest Windows 10 version, right? Aren’t you wondering where the old version of the OS is? Well, most people think that after installing the new Windows 10 the old Windows gets deleted. But that is probably not the case. It is still on the PC, and the C drive under the folder name ‘Windows.Old’. Don’t believe us? Well, you can check and if you want to know how to delete that folder then read on to find out.
Don't Miss: How To Free Up Hard Disk Space In Windows 10 (Quick Tips)

Deleting The Windows.Old Folder

Surely, Windows.Old is a very essential for you if you discover the fact the new Windows 10 is not up to your expectations or you just don’t like it, although that happens quite rarely. Then with the assistance of the Windows.Old folder, you can quickly turn your computer into the way it was before.

But then, the thing is, the folder takes up a lot of disk space on the computer, so for those who don’t need the folder, the smart thing to do would be to delete it. And for that reason, most of the users are always looking for ways to delete the folder or other older versions of the Windows to free up the disk space. After all, there is no reason to keep the folders that consume too much of the system and for no reason, right? So, for those who want to delete the Windows.Old folder, here we are with a method where you can quickly delete it without any extra effort.

Essential Things To Remember
  • Firstly, if you want to restore the old version back to your computer than deleting it won’t be a good idea. So make sure that you are all decided first.
  • Secondly, if the consumed space by the old version of Windows doesn’t bother you too much, then you don’t have to worry about it as Windows 10 does the job of deleting it after 30 days itself.
  • Thirdly, if you want to delete the old version and reclaim the disk storage, then this method will help you in doing so.

Delete The Old Folder Using The Settings App

The first thing that you have to do here is to open the Settings App. For that press WIN + I keyboard shortcut. Alternatively, click on Settings icon available on the Windows 10 taskbar.
5 Important Ways That Social Media Can Boost Your SEO
In the Settings, app windows click on the section named as System.
5 Important Ways That Social Media Can Boost Your SEO
In the System Settings window, switch to Storage tab available on the left side. On the right side under Local Storage click on This PC (C:) drive (Windows installation drive).
5 Important Ways That Social Media Can Boost Your SEO
In the next Storage usage window, you will find out all the details about what are the things that are consuming space of your C drive. Wait for few seconds to completely load the details. Here you need to look for a title named as Temporary files and click on the same.
5 Important Ways That Social Media Can Boost Your SEO
In Temporary file window, you need to check the box for option "Previous version of Windows" and then click on Remove files button.
5 Important Ways That Social Media Can Boost Your SEO
That's it.

Now, the process might take some time, and it depends on the size of the files. The process of deleting Windows.Old Folder is a straightforward if you go by this method.

Alternative Method

You can take help of disk cleanup utility that comes preinstalled in Windows operating system. To remove previous windows installation. Here is what you need to do:

Press WIN + E to launch File Explorer. Alternatively, you can click on File Explorer icon available on the Windows 10 taskbar.
5 Important Ways That Social Media Can Boost Your SEO
Click on the This PC. On the right side make right click on the C: drive and from the context menu select Properties.
5 Important Ways That Social Media Can Boost Your SEO
Here you need to click on the button named as Disk Cleanup.
5 Important Ways That Social Media Can Boost Your SEO
This will launch the Disk Clean for C: window. Here you need to click on the button named as Clean up system files.
5 Important Ways That Social Media Can Boost Your SEO
A small disk cleanup dialog will start looking for all the disk file and later show you Same disk cleanup for C: drive windows.
5 Important Ways That Social Media Can Boost Your SEOHere you need to check the box for an option named Previous Windows installation and click on OK button.
5 Important Ways That Social Media Can Boost Your SEO
That's it.

Your previous version of Windows will be deleted successfully. I hope you find it useful.

Let me know your thoughts in the comments.

AUTHOR_NAMEAbout the Author:
Himachali, Mechanical Engineer, Snooker Lover, Avid drinker of Scotch, Content Creator for Geeker Mag, Traveler and shorter than you (probably).

How to Boost Your Windows Performance

How to Boost Your Windows Performance
Windows users always admire its compatibility and user-friendly interface while performing different tasks seamlessly. Started from Windows 1.0 in 1985 to today’s Windows 10 version, Microsoft has always tried to keep its operating system full of amazing and useful features. Despite being one of the most potent systems, Windows are not immune to some common computer performance issues. In this article, we have discussed ways to help you boost your Windows system performance instantly and effectively.
Don't Miss: 5 Basic Tips To Increase Gaming Performance

Update Software:

Windows keeps on releasing software updates at regular intervals to keep your system performance intact. These updates are meant to fix certain bugs, add security patches and other useful features to improve your system performance. Try to download all software updates that you find automatically in notifications. Apart from it, you can also look for updates manually by searching “Windows update” in the run box and selecting it from given options. It will open a new Windows updates window, click on “Check for updates” there. Here, it will start searching for all latest available updates and display it to you to help you update your system.
How to Boost Your Windows Performance

Use Disk Cleanup Utility:

You can use built-in Disk Cleanup utility on your Windows system to find and delete all junk files. To access this utility, search “disk cleanup” in the run dialog box and select it from there. On Disk Cleanup window, select the files you want to delete and press OK. You can also tap on “Clean up system files” option to remove old & obsolete system files. You can use this instant utility to disk cleanup in Windows.
How to Boost Your Windows Performance

Update Drivers:

Drivers play important role in keeping your overall system performance intact. You should check for all available driver updates to smoothen your system performance. To use this feature, search “device manager” in the run dialog box and select it from the given options. Once you are on Device Manager window, select the category to update the drive. To do this, right-click on the selected category and choose “Update driver software”.
How to Boost Your Windows Performance
Here, it will display two options:

First, “Search automatically for updated driver software” that will automatically update the driver software.

Second, “Browse my computer for driver software” that asks you to browse the driver location to update it.
How to Boost Your Windows Performance

Manage Startup Programs:

You can remove unnecessary startup items that run during boot time to improve your startup process significantly. To do this on Windows 7, search “msconfig” in the run dialog box to open System Configuration window. Now select Startup tab to find all startup items. Sift through the list to find unnecessary programs and uncheck them to stop them running during boot time. Press Apply/OK and restart your system to see changes.
How to Boost Your Windows Performance
To do this on Windows 8 and later, right-click on Taskbar to select Task Manager. On Task Manager window, tap on “More details” button and then Startup tab to view all startup programs. Sift through the programs to find unnecessary ones. To disable any program, right-click on it and choose Disable. Reboot your computer.
How to Boost Your Windows Performance

Uninstall Unnecessary Programs:

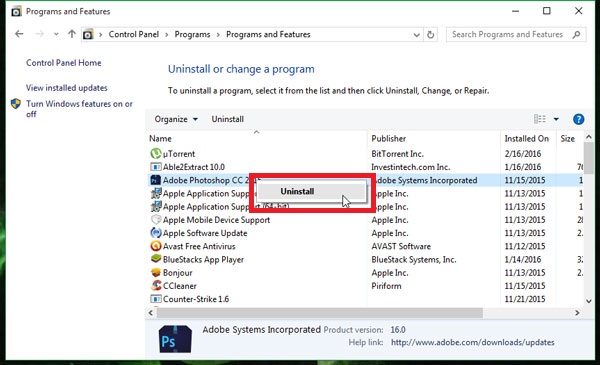
You can consider uninstalling bloatware and other unnecessary programs to recover some disk space and improve system performance. To remove any program on Windows 7, go to Start menu > Control Panel > Programs & Features. Here, sift through the list to find unnecessary programs, right-click on it and select Uninstall.
How to Boost Your Windows Performance
To remove unnecessary programs on Windows 8 & 8.1, open Start Context Menu and select Programs and Features. Here, select the program and then press Uninstall to remove it.
How to Boost Your Windows Performance
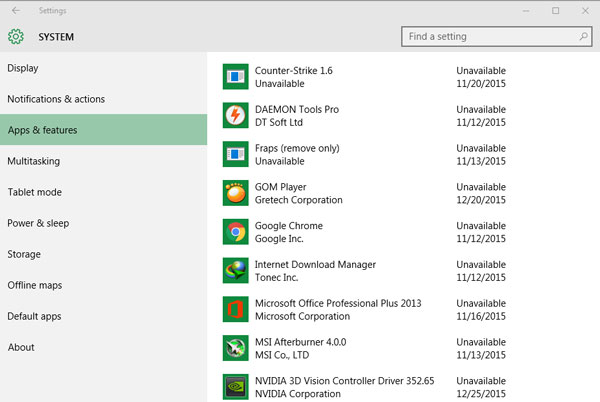
To do this on Windows 10, go to Start menu > Settings > System and select Apps & features from the left pane. Sift through the list to find an unnecessary program, select it and press Uninstall to remove it.
How to Boost Your Windows Performance

Conclusion:

Windows offers various built-in utilities to deal with numerous performance related issues. These utilities help you recover disk space, protect your system from malware threat, keep your software update and help you in different ways. Apart from using built-in utilities on your Windows system, you can also try third-party tools for instant and effective results.

How To Free Up Hard Disk Space In Windows 10 (Quick Tips)

How To Free Up Hard Disk Space In Windows 10
Hard disks are getting larger in space and becoming small physically. There was a time when 5MB hard disk had a look like a 15 KVA generator. But time is changing fast and every day is a tech revolutionary day. As time passes, information technology raising up its fly to the success.

Well! today this blog article helps to clean up hard drives from useless stuff like internet cache, temporary files etc and also guides you which software or application you should keep in your windows. Because unnecessary softwares also reserve space of hard disk that becomes a cause of low space too. So let's start.

How To Free Up Hard Disk Space In Windows 10

There are several ways to clean up disk space and maintain hard disk in good health. You can follow both ways. By using built-in options of operating system or by using third party softwares that are mentioned below. Here we go how can you do this.

Use Disk Cleanup

Disk cleanup is a built-in option available in windows. By using this option, you can free up your disk from unnecessary files like temporary internet files, offline web pages, thumbnails etc. To free up your disk, go to 'My Computer' or 'This PC' and right click on the drive that you want to clean and click on the 'Properties'.
How To Free Up Hard Disk Space In Windows 10
Once you click on properties, a separate popup will be opened. Here click on 'Disk Cleanup'
How To Free Up Hard Disk Space In Windows 10
After that another separate pop-up will open. Now here under the bar of 'Files to delete:', you can mark on files that you want to remove.
How To Free Up Hard Disk Space In Windows 10
Once you've done, simply click on 'OK' then 'Delete Files'.
How To Free Up Hard Disk Space In Windows 10

Clean Up Temporary Files

Windows disk clean up is helpful. But remember, it doesn't clean your browsing internet cache which reserves your disk space the most. You must have to use any third party software to clean up temporary internet files or cache.

To do this, you can use Ccleaner. The most popular software to free up hard disk from temporary or junk files. There are other software available also, but this one is my recommended. Must use this software and remove junk files from your hard drive.
How To Free Up Hard Disk Space In Windows 10
Get Ccleaner officially from here.

Uninstall Useless Programs or Applications

Uninstalling useless programs or apps may also be helpful for you. If you check your control panel, so there are many programs you will see which are space hungry programs and useless too. So in this situation when you need space, you should uninstall these types of programs from your computer. There may be some apps which do not reserve huge space, so you can skip them.

There are actually two ways to uninstall. First is by using built-in uninstaller and second is by using third party uninstallers. For third party softwares, I would like to recommend some trusted and popular uninstallers here '3 Best Third-Party Uninstallers For Windows'. Must try them, if any program is not uninstalling completely from built-in uninstaller. Because it is possible, sometimes windows doesn't uninstall program completely. So in this situation, you might have to get third party help.

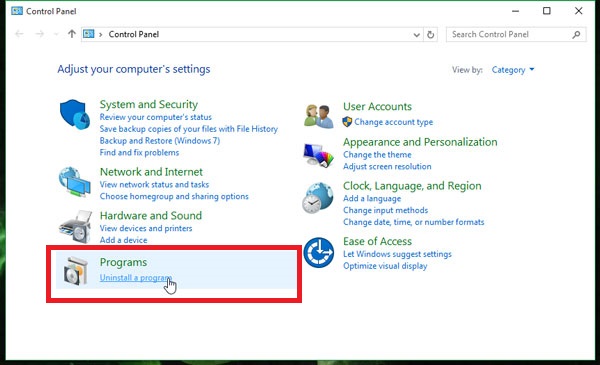
Everyone should use built-in windows uninstaller first. To do that, simply go to Control Panel. After opening separate pop-up, click on 'Uninstall a program', if you are viewing by category like below image.
How To Free Up Hard Disk Space In Windows 10
Now here you can easily select such apps that you're going to uninstall. You can also here check space of programs. Simple right click on program which you want to uninstall, then select 'Uninstall'. Example is shown in this image.
How To Free Up Hard Disk Space In Windows 10
If you're a Windows 10 user, so you have an additional advantage. You guys can also check a complete detail of installed apps through Setting. Navigate this to reach out Settings < System < Apps and features. Once you reached, so at right pane, a complete detail will be showing. Here you can also select and uninstall program easily.
How To Free Up Hard Disk Space In Windows 10

Remove Duplicate Files

Removal of duplicate files may also be helpful to clean up hard disk. You can use duplicate file finder to detect and remove duplicate files. Well! there are many softwares available on the internet to do this work. But i would like to recommend here 'VisiPics'. This one program is really good and very helpful to find duplicate pictures which reserves unnecessary space of hard disk. Must use it and try to remove duplicate unnecessary files.

Final Thoughts

So these were few quick ways to free up your hard disk space. By following them, you can remove junk files and expand hard disk space easily. There may other ways possible, but in my views these are enough to clean hard disk from junk and useless files. If you want to recommend more other ways, so leave your comment below.

Must give us your views about this article and share it, if you think it's helpful for others.

How To Disable mdm*32 Process Permanently in Windows 10

How To Disable mdm*32 Process Permanently in Windows 10
Disable mdm*32 Process Permanently in Windows 10
mdm is an abbreviation of Machine Debugger Manager. The process is not harmful actually, but sometimes it may be dangerous for those who have installed graphics card in their systems. The process begins whenever operating system starts, which is used by the Windows NT Option Pack and Microsoft Developer Studio to provide application debugging. It's not essential, but it can reserve up to 38% processing speed while running computer. As I said, it's really harmful for those who have graphics card because when this process starts then GPU temperature increases without gaming or playing games. So in this situation, if you start a game then your GPU may be burn due to high temperature. That's why we should close this process. Otherwise, something else may have happened wrong.

Is This Process A Virus?

While searching about mdm process, I saw different users who were asking a very common question "Is this process a virus?" Actually, it's not a virus. It enables due to the internet explorer Script Debugging. It means, the process directly links with it. But it may be harmful for those who have graphics card. Because I've said it already, when this process starts then GPU temperature increases up to 75-78°C. So in this situation, when you'll start a game as well then your GPU may be burn. That's all!

How To Disable mdm*32 Process Permanently?

To disable this process permanently, you have to turn off it from two places. First is 'Windows registry' and second is 'Internet Explorer'. In actual, The file mdm.exe is located in a subfolder of "C:\Program Files\Common Files" or sometimes in a subfolder of the "My Files" folder (usually C:\Windows\System\ or C:\Program Files\Common Files\Microsoft Shared\VS7Debug\). But you have to disable just from two locations that I mentioned below. So follow the steps perfectly and close this process permanently.

1. From The Internet Explorer

To disable this process, first open your Internet Explorer, click on its setting icon and then go to 'Internet Options'.
Disable mdm*32 Process Permanently in Windows 10
After that, a separate pop-up will be displayed. Here, click on 'Advanced' and then find 'Disable Script Debugging (Internet Explorer)' and 'Disable Script Debugging (Other)' under the options of Settings. Once you got them, so mark them and click on 'Apply' and then 'OK'

Disable mdm*32 Process Permanently in Windows 10

2. From Windows Registry

To disable from Windows registry, first open the Run by pressing 'Win+R' keys and type 'Regedit', press the Enter.

Disable mdm*32 Process Permanently in Windows 10
After the opening of Windows Registry, navigate the following keys at left pane.
HKEY_LOCAL_MACHINE/Software/Microsoft/Windows/CurrentVersion/Run
Once you got Run folder, click on it and find 'MDM7' at right pane. After that, right click on 'MDM7' and delete it. That's it!

Disable mdm*32 Process Permanently in Windows 10

Final Words

So, this is out today's article. Hope, it will be helpful for all who are suffered from mdm*32 process. It's actually not a virus, but still harmful. Why harmful? I've mentioned reason of that. Well! if you find help in this article, so don't forget to share it with others especially who are victim of mdm*32 process and Windows 10 users. Must give your views about via comment below too.

Get Ready Or Optimize Windows 10 For PC Gaming (Quick Tips)

Get Ready Or Optimize Windows 10 For PC Gaming (Quick Tips)
Optimize Windows 10 For PC Gaming
As we know, Windows 10 has been released and this version is really best for gaming after Windows 7. Gamers should try Windows 10 for gaming and share also an experience about to enjoy gaming on it. The most highlighted stuff is DirectX 12, which is introduced as well as Windows 10. After the releasing of Windows 10, I heard an issue about gaming that Windows 10 isn't supporting to games. I heard this from my friend, he's a PC gamer. So after that I researched about it and tried to solve 'Why gaming issues are happening in Windows 10?'

Before releasing Windows 10 officially, I read different reviews about gaming on Windows 10. So I knew that Windows will be the best version for PC gaming. Similarly, I also heard that PC and Xbox users will also be able to play games togetherly with Windows 10. So I was excited and expecting that this version will create a positive impact in our minds. But when I heard that Windows 10 isn't running games properly then I astonished at that time temporary, but now I found reasons behind this happening issue.

Different reasons may be possible which creating bugs while gaming. So if users consider them before playing games then problems may be solved. Because It's not a fault internally in Windows. These are externally issues that everybody can solve easily. So below are few basic and quick tips to optimize Windows 10 for gaming. Must try them before changing or downgrading your operating system.

Turn off Automatic Updates

One of the most hated stuff in Windows 10 is getting automatic updates. Microsoft introduced first time new and interesting features in this version like action center, Cortana, Microsoft Edge etc. So with all of them, Control panel menu is also different and first time introduced. Windows 10 has two setting panels. First is totally like previous versions panels. But second is different. Options, features, menus, in short everything is different in new Setting or Control Panel.

So whoever used Windows 10 yet, then faced Windows 10 automatic updates issue. So must turn off first automatic getting updates and then play games in Windows 10. Because while gaming, when Windows gets updates then it reserves memory and processes which create problem while playing games. So if you don't know how to configure updates setting in Windows 10 then read this article "How To Disable And Configure Automatic Updates In Windows 10?". Hopefully, you won't now face automatic getting updates problem next time.

Disable OneDrive

OneDrive was introduced first time in Windows 8 that's really helpful in my views. But if you've a gaming PC and windows 10 is installed in it then you should close OneDrive before gaming. Actually, OneDrive reserves bandwidth and in windows 10 most as compared with Windows 8 or 8.1. So disable it. To exit or disable its processes, simple right click on its icon at taskbar and then click on Exit.

Similarly, open your taskbar and check at once that 'Is OneDrive open or not?'. If it's processing then End this.

Use Overclocking Tools

Hope, you are well aware from overclocking Softwares. These tools help to overclock GPU. Overclocking means it helps to increase GPU core speed, memory speed, memory bandwidth, texture rate, pixel rate etc. I'm using now GTX 550ti, so GTX 550 ti core clock speed is 981 Mhz. So whenever I run overclocking tool then I set its setting to medium. It's mean I increase its core speed up to 1050 Mhz or even 1200 Mhz. Similarly you can increase more other important things of GPU which are important to play games.

Here's my recommendation, if you've an old GPU, so must try overclocking softwares. Recently, I wrote an article on "2015's Overclocking Softwares". So must read it and find best overclocker for you and your GPU.

Optimize SSD (Solid State Drive)

Optimization of SSD may be helpful. Most PCs have HDDs but this is a technology era and now users are starting to use SSDs in their computers especially gaming PCs. So if you've SSD installed then optimize it. Otherwise, skip this tip.

Basically, both drives are great, I mean HDD and SSD. But if user optimizes SSD in Windows 10 then it would be a good impact on gaming. So here in this article "SSD Optimization for Windows 8 and 8.1, Windows 10", a complete guide is explained to optimize SSDs.

Uninstall Unnecessary Updates

You as much as possible should avoid from unnecessary updates in Windows 10. Because it might be effected for your gaming. So if you've installed updates, but don't know, what updates installed then check updates history and uninstall useless updates. If you don't how to do it, then here are steps for your convenience.

Open Windows 10 advanced setting panel from start bar.

Optimize Windows 10 For PC Gaming
Go to the 'Updates & Settings'.

Optimize Windows 10 For PC Gaming
After that, select 'Windows Updates' at left pane and then click on 'Advanced Options' at right.

Optimize Windows 10 For PC Gaming
This action will occur advanced options of Windows updates. Here find 'View Your Update History' and then 'Uninstall Updates'.

Optimize Windows 10 For PC Gaming
Once you clicked on this option, all installed updates will be shown in a list. Now here select installed update that you wanna uninstall or useless for you, right click on selected update and click on 'Uninstall'. That's it!

Optimize Windows 10 For PC Gaming

Uninstall or Remove Incompatible Softwares

If you've upgraded Windows 10 from previous version, so it's possible that previous operating system's softwares and applications may be present in Windows 10. Drivers may uninstall but softwares not. So if you reserved Windows 10 and downgraded then check Control panel must and find useless application which is installed in Windows 10.

5 Best Ways To Open Task Manager In Windows 10

5 Best Ways To Open Task Manager In Windows 10
Ways To Open Task Manager In Windows 10
Task Manager is the most used tool in Windows OS because by using it you can quickly close unresponsive programs and check about unwanted background running programs that reserve huge part of Ram memory. By using task manager, you can check background programs, processes, performance of your CPU, App history, start-up programs, users and all that matter for you.

Anyway, there are several ways to open task manager and I think, you are aware from few basic ways like 'ctrl + alt + delete'. But below I shared some other ways also that normally users don't know about them. You can also open task manager by following them. If you're using Windows 7, 8 or 8.1 then also can follow below. That's not matter, which operating system that you're using now. Because these operating system have almost similar options and task manager ways are also same.

1. By Using 'Ctrl + Shift + Esc'


Ways To Open Task Manager In Windows 10
As we know about 'Alt + Ctrl + Delete' keyboard shortcuts that help us to open task manager pop-up. Similarly 'Ctrl + Shift + Esc' also help to open it. Normally user wanna use keyboard shortcuts and these keys are best to apply or open task manager. No extra time will waste and task manager will be opened easily.

You can use Ctrl and Shift key of both the sides of keyboard, as you wish. If you use left side Ctrl and Shift key then it's good, but if you use at right side, so no problem. But I'll prefer to use left side keys because I'm a left-hander and I always try to use left-hand keys. :p

2. By Using Run

Windows Run Commands is another finest way. You can do lots of similar work in few moments by using Run Commands. So you can also open task manager by using Run. To do that, just open the Run by pressing windows + R keys, then type taskmgr and press the Enter.

Ways To Open Task Manager In Windows 10
After this action, task manager will be opened and now you can close unwanted programs, applications or whatever you want.

3. From File Explorer

File explorer is another best way to open Task Manager. It's quite sensitive. But you can do it safely by following below steps.

To open Task Manager from File Explorer, press the keys Windows + E first. Navigate the following location in the search of file explorer.
C:\Windows\System32

Ways To Open Task Manager In Windows 10
Now find here 'Taskmgr.exe' application and run it as an Administrator. So when you run it then Task manager obviously will be opened.

Ways To Open Task Manager In Windows 10

4. By Using Cmd (Command Prompt)

Command Prompt is another reliable way to open Task Manager. To Open it with Cmd, simply open Command Prompt first. You can open it by searching cmd in search tab or Windows 10 users can also open it by right click on Start Up icon like below image.

Ways To Open Task Manager In Windows 10
Once it has been opened, then type taskmgr and press the Enter. This action will definitely open Task Manager pop-up and you can manage everything here that you want with it.

Ways To Open Task Manager In Windows 10

5. From Task Bar

Last and very simple way to open Task Manager is from Taskbar. From Taskbar, you can open it very quickly. Simply, right click on task bar and then click on 'Task Manager'. So this will open directly Task Manager pop-up and can see here about running programs, applications and other processes easily. That's it!

Ways To Open Task Manager In Windows 10